
We decided from the outset that we were going to have a composting toilet. There were a number of reasons for this, principal among which were that we didn’t want to waste an extremely valuable resource (humanure), and that we don’t have sufficient water to operate a flushing toilet.
The first model that we built, and which we used for more than ten years, was based on one of the 200L barrels used for shipping olives. These barrels are usually available from places that recycle poly barrels. The only reason that we stopped using this model was that it gets to be a bit of a chore to move a 200L barrel full of poop when the time comes to change it over. It was taking me about half a day to undo the connections, replace the full barrel with an empty one, and re-connect it – and I always seemed to put off the change-over until it became urgent (i.e. a very full barrel) and that always seemed to coincide with another urgent priority. Of course you could always install two 200L barrels side by side (both plumbed to drains and the air vent) and simply move the seat from one to the other, instead of changing over the barrels. I’ll describe the new system which uses a 60L barrel in another post.
The basic principles of the design we adopted are: a) air is drawn down through “the mass” in order to keep up a supply of oxygen to the composting process and to remove smells through the bottom of the barrel and up to a high vent; b) a sufficient mass builds up to start and maintain an efficient composting process; and c) worms can be introduced to the mass while the toilet is in operation to promote the production of a rich compost loam.

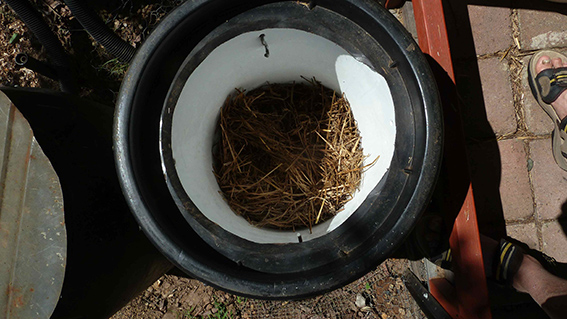
The final product – a rich loamy compost with lots of happy worms (the bits of straw don’t indicate that it is not fully composted – the straw was a top layer to help keep the mass from drying out)
In order to reduce the amount of text required, I’ll use photos to illustrate the construction of the unit. Here’s a view of most of the components associated with the barrel.

Internal fittings and outside connections
In the background is the barrel with, on the left, a connection for extracting air from under the mass, and on the right, a drain for liquids. The connections are made up from standard plumbing fittings. In the left foreground is the base which supports the mass, made up of a circular section of 25mm galvanised mesh resting on some sections of plastic pipe – in the centre is some 225mm stormwater pipe (got it cheap as an offcut at the local irrigation supplies place), and some offcuts of 90mm stormwater downpipe (these dimensions aren’t critical, your pipes can be larger or smaller). These are bolted together with galvanised 6mm bolts that have lasted for ten years, though they are now unrecognizable under a layer of rust. You can also use reinforcing mesh supports instead of the pipe sections as in this post on the Milkwood Permaculture site (though this gives a smaller space under the mass). This unit goes into the bottom of the barrel (after the drainage fittings are connected).
In the right foreground is the unit for drawing air down through the mass. The vertical components are 50mm pipes with many holes drilled in them to facilitate air exchange with the mass (you could use polypipe for this – it’s more flexible and cheaper). These are bolted onto a short length of 225mm stormwater pipe. Note that the vertical pipes extend down past the 225mm pipe – the distance they extend downward is the same as the height of the stormwater downpipe lengths under the galvanised mesh on the left. These “legs” go through holes cut in the mesh (visible in the photo), so that the 225mm pipe section sits on top of the mesh.
The photo below shows the two units sitting in the barrel. Short lengths of polypipe have been inserted into the tops of the vertical pipes to extend the aeration height. The top ends of these extensions will be pulled to the sides of the barrel just under the top lip and fastened with wire loops through holes in the barrel. If they aren’t pulled to the sides they tend to snag toilet paper as it is dropped into the barrel.

All components in barrel
When the barrel is in place and ready to be used a layer of newspaper is placed over the mesh and then a thick layer of straw (we use barley straw) is put on top of that.
The photo below shows the detail of the air outlet.

Air outlet detail
There are four parts to this connection. A male/male connection is screwed into a hole cut in the side of the barrel with an appropriately sized hole saw (keep it close to the bottom, but not so low that it will be lower than the liquid drain) so that the thread protrudes inside the barrel. A connector (i.e. with internal thread) is screwed onto this inside the barrel so as to clamp the fitting onto the wall of the barrel. Before tightening this I’ve put some bathroom silicone into the space around the connector on the inside and outside of the barrel to make a good seal. Reaching to the bottom of the barrel will almost certainly require getting your head and at least one shoulder into the barrel – not easy to do. I once rolled some distance down the hill with my head and part of my upper body inside the barrel! The fitting on the outside end of this connection has various names. My local plumbing supply calls them “dress flanges”. Anything will do that will fit into the flexible pipe shown in the photo below.
I won’t show the details of the liquid drain. It’s the same principle as the air outlet, but with appropriately sized fittings, and as close to the bottom of the barrel as you can place it. Just make sure that the connection between the pipe coming out of the barrel and the drain to take the liquid away is easy to connect and disconnect. After a lot of frustration I settled on camlock fittings (you’ll have to ask your local hardware or plumbing supply place what these are as I don’t currently have a photo of one – there are some details on these fittings here).
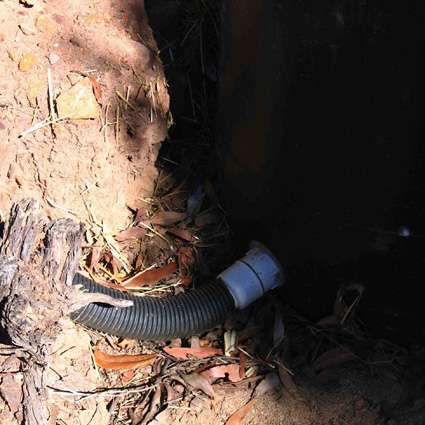
Air outlet with flex pipe
The flex pipe can be difficult to source in our area. Most places sell this pipe with many slots in it for use as a greywater distribution pipe but we need it without any holes. In the end I got mine from an agricultural machinery parts supply place that sells it as a spare part for seeding machinery.
This pipe is connected to a vertical vent pipe (another length of 90mm stormwater downpipe).

Bottom of vent pipe
The fittings here should be pretty obvious. The reason for the Y-junction at the bottom of the vent pipe is to allow condensation or rainwater to be drained out (in practice it seems to collect here and then evaporate without needing any intervention).
At the top of the vent pipe you’ll need a sewer vent whirlybird. They’re available from plumbing supply places. You can get one to fit onto 90mm or 100mm stormwater pipe, but I added a short length of wider pipe at the top and got a whirlybird that would fit onto that. The top of the vent pipe (or all of it) can be painted black so that the sun heats the air in the pipe and starts it moving upward, assisting the whirlybird to draw air down through the mass in the toilet. The wider pipe at the top just provides a larger volume of air to be heated – I’m not sure whether it makes any difference or not.

Whirlybird on top of a section of wider pipe
That’s about it, apart from putting a seat on top of the barrel. I used the screw-down flange that holds the top of the barrel in place (photo below) and just trimmed a bit of the edge of it at the front to allow well endowed males to use the toilet without incurring any risk. Ignore the white insert in the barrel, this is part of a trial of new approach that doesn’t allow for composting in the barrel but removes the need to wrestle with a full 200L barrel when full. I’ll describe it in another post.
Top on barrel
The seat base in the photo below is made from two layers of marine ply. The top layer is large enough to sit over the top of the barrel and to carry a standard toilet seat. The lower layer (not visible here) has the same size hole as the upper layer and is glued and screwed to this. It is just large enough to fit into the screw-on top of the barrel without too much free play. In this way the seat stays in place without moving around when you sit on it, but can be easily lifted off the top of the barrel. This doesn’t have to be marine ply, but since it was going to be out in the weather for years I thought it was worth the extra cost. You can see the toilet seat to the left of the photo and in the lower photo – it came from a recycled timber yard.

Seat base
 Here’s a shot of the two barrels in place. The “resting” barrel on the left finishes composting while the barrel on the right fills (you can’t really see it because it’s covered with shade cloth – the photo was taken in summer and the shade cloth is needed then to keep the barrel from getting too hot for the worms).

Two barrels in place
Once the barrel is about one-third full we add some compost worms from one of our worm farms to it and cover them with a layer of damp soil. At first we doubted that they would tolerate this environment, but they take to it readily and by the time the barrel is full it has a good population of worms and a lot of the mass has already been broken down by them.
With just the two of us using it the barrel takes six to nine months to fill. In fact in the later stages the mass is reducing in volume, as a result of the composting process and the actions of the worms, just about as fast as we are adding volume to it.
There aren’t any special precautions to take with this type of toilet, apart from making sure the mass is damp enough to keep the composting going – we keep a spray bottle near the toilet, but seldom need to use it. People who are taking antibiotics should refrain from using the toilet in case the antibiotic residues affect the composting process, and no non-compostable material (e.g. cigarette butts, tampons) should be put into the barrel.
When the full barrel is first moved to the resting position we put a layer of kitchen scraps on top and cover it with damp newspapers. This encourages the compost worms that are already in the barrel to come to the top and start work on the top layer. If the worm population isn’t obvious in the top layer within a couple of weeks we add more compost worms.
The resting barrel has a liquid drain and a flexible hose connected to it, but the latter is mostly to keep critters from getting into the bottom section of the barrel. I always intended to connect this to the vent pipe but never got around to it, and in the end it didn’t seem to matter. In fact increasing the air flow might have dried out the mass too much. Keeping the top of the mass damp is one of the few management measures that the resting bin requires. We generally cover it with a thick layer of wet newspapers or hessian, and try to remember to add water to this occasionally.
You can wait for all of the mass to be composted and then empty the barrel just before changing it over with a new full barrel, but we have found that the worms population will be larger and work more effectively if we regularly take off the top layer of composted worm castings.
I’m happy to answer any questions about this system or to give advice on construction.

Nice! Was thinking of doing something similar with an 80l wheelie bin, any thoughts on this?
Im assuming you’d leave the venting, mesh setup in until removal of composted manure/worm castings? So would have 2 of these?
Do you divert urine from your toilet?
And do you needsomething under drainage pipe to collect liquid?
Thanks muchly
Hi Waikarere Gregory
Welcome to the community of composting toilet users. We’ve been using them for over 20 years and still convinced they are the best option.
Yes to two bins, and to leaving the bottom mesh etc. venting and connected drain. I usually left it until the new bin was within a couple of weeks of being full (a couple of weeks to allow for delays and procrastination that might lead to the in-use bin getting too full), and then emptied and cleaned the mature bin.
Diverting urine is essential. In general any smell from composting toilets comes from (most likely) urine and faeces coming into contact. The straw layer on the mesh in the bottom stops faeces from dropping down into urine, but the drain stops the urine level from coming up to the faeces. The other source of bad smells from composting toilets is the mass going over to anaerobic breakdown because of a lack of air circulating through it. Oh, and a third source is people putting vegetable waste (and/or, god forbid! meat scraps) into the toilet.
We run the drainage pipes (from the in-use and maturing bins) down to a container hidden under a bush and try to remember to empty it into the compost heap when it gets full. If we forget for a while it just means the bush gets a lot greener.
Re wheelie bin I can see some issues, the main one being emptying it. Wheelie bins are so long, and relatively narrow at the bottom that I would guess that there would be a lot of adhesion to the sides that would make emptying it difficult, and cleaning it possibly also difficult. The latter because there are unavoidable occasions when you need to give the inside a good scrub to remove stuck-on remnants. I generally use a high pressure hose nozzle to dislodge any stains and lumps, but unless you had that and a long-handled brush or small broom head it might get a build up on the sides that could make emptying it more difficult as time goes on.
However since I have no experience with wheelie bins I suggest you try to find a forum where there might be people with that experience. I have heard of people using these, but have never followed up to see how well it worked out.
The other thing about the wheelie bin is that unless you have room to put in the “aerator” pipes that are in our design there may be an issue of the worms (and the breakdown process) not getting enough oxygen.
But then wheelie bins have the great advantage of being easy to drag to wherever you are going to dump their contents.
How about not putting worms in it for now, and if possible not putting too much effort into “superstructure” for a seat support etc., and see how well it works for a while.
Let me know how it works out.
Regards
Gordon
Great post. do you take the aerating system (the pipes with holes) out to use on the next bucket when it’s full?
Hi… thanks very much for you site… great info. We’ve tried to find a sewer vent whirlybird… without any luck. Can you please tell us …the actual size whirlybird that you used…and where you got the whirlybird and the expander(s) from. Thanks very much, Jonah.
Hi there! I just wanted to say ‘thank you’. After looking all over the web for the perfect DIY composting toilet, I came across your design a couple of years ago. I have installed 2 of these on our farm in Colombia and I have been asked to host several workshops along the Caribbean coast of Colombia where water shortages are strive. At this point, many eco hotels in the towns of Palomino and Minca are using the design successfully. I have made a few changes and use BSFL rather than composting worms since they occur naturally and arrive on their own accord. We use leaf mulch as cover material that we get from a dedicated leaf compost pile. We have virtually no wind so I installed a little 12V computer fan in the chimney that runs on solar power. I have some pictures up on our facebook page http://www.facebook.com/quebraddp and I’m about to start a page dedicated exclusively to the baños de compostaje, as they’re called here. My workshops are almost for free (I charge $3 per person to compensate for transport expenses) and I share the design plans for free with as many people as possible. Your design is by far the best working system out there!! THANK YOU!
Bjorn De Boeck and the author of this blog. I live in Chile and am interested in this design as well. In the above article you mentioned this is what you used for several years but had moved on to something else but I have yet to find the new design. SO I’m curious how you improved this amazing system? I live in a simple house built on wood posts in the woods and am planning on constructing this or similar system if I can be assured it won’t stink and that I can acquire the neccesary worms.
So if either of you have any new suggestions I’m all ears!
Hi Stanley. There was one main reason that we changed the design design. This was because the outdoor shower/toilet location is cut into the side of a fairly steep hill, so that the platform where the two toilet barrels are located is quite small. As a result it was difficult to change over from one barrel to the other when the first is full. And 180 litres of damp and partly composted “mass” is pretty heavy. It involved disconnecting the two pipes at the bottom of the full barrel (drain and air) in a very limited space, then getting the full barrel out of the way so that the empty one could be moved into its space and reconnected. Then move the full one to where the empty one was and connect up a drain to it. At minimum an hour and a half and often longer and quite heavy work. Only needed doing once every 10 months or so for two of us, but it always seemed to need to be done at a particularly busy period in our lives. It wasn’t because there was anything wrong with the principle or the design, just the location.
The modification I made was to leave the barrel in place, with its drain and airflow, but take out the bottom metal mesh that held the filtering layer of straw. Then I put several bricks on the bottom of the barrel, and sat a vary large bucket on top of that. The bucket has drain holes in the bottom, and a metal mesh that sits on a support (a 40mm long section of a stormwater pipe about 250mm in diameter). As in the old design, this mesh supports the straw filtration layer. Urine passes through this and into the bottom of the old barrel and out the drain.
The bucket is tall enough to reach up to just under the toilet seat. I drilled some oval holes in opposite sides of the top of the bucket so that I can lift it out with a length of chain that has hooks attached to each end to hook into the oval holes.
When the bucket is near full I carry it away (because of the draining through the straw and out the bottom of the bucket there is no leaking as I carry it). The contents are buried in a long trench (next to the last load) and covered over with a layer of soil and then straw, and a sheet of metal mesh to stop animals from digging into it. The area is watered once a week or less. The bucket is hosed out and replaced. By the time the bucket needs to be emptied again the last load is nearly composted.
I harvest the compost from the oldest end of the trench – after about 3 months the worms and other soil organisms have turned it into soil – and bury it in an empty section of the vegetable garden.
About the “stink”, it is when urine and faeces are mixed that the smell problem arises. Sure, some faeces are stinky when fresh, but mostly from people who eat a lot of meat or are unwell. That smell goes away quickly when they are covered with chopped straw and begin composting. But effective draining the mass of urine almost totally removes the smell factor with our new bucket system, and the vent takes away anything that might be there from time to time.
The old system, with long term composting happening in the big barrel and with worms helping the process along, never had a smell.
With your house on wood posts, is there enough height under the house to put the barrel there, and to have enough room to change barrels when the need arises? You would need a suitably long and wide chute/pipe from the in-house toilet seat vertically down to the top of the barrel. NatureLoo used to make a system like this with composting units to go under the house, but the composting units were clumsy to move and to empty and were made to be “parked” for months to allow the composting to occur. From my point of view it also has the problem that you can’t make sure that the material in the barrel is covered with straw, and you can’t monitor the moisture to be sure it is not too dry or too wet.
If you have sufficient height under your house you could make two small platforms on wheels and sit your barrels on those to make it easier to do the change over.
Let me know what you decide to do and how it performs.
Regards
Gordon
Wow I’m impressed with the speed of your response! I’m working on this project at the moment so this really helps me plan it out. I understand the changes you made and they make sense. (Although pictures would be helpful, especially to visualize the 2 bucket configuration and size of the smaller one) I would have the same restrictions with space and weight in a cramped space if I followed the original layout. The space under my house exists but only after excavation by hand and reinforcement of the earth with concrete so as to hold the walls around the area from colapsing. My loo location was decided long ago without taking space into consideration and is located a little too close to a crucial post so my concrete work had to be creative and rather precise. In order for you to get a better picture of my idea, in the event you care to respond with suggestions or your opinion… The location of the loo inside the house places it in a line between the 2 drains of the kitchen sink and the shower. Currently I have a grey water gease seperator and leach field. My idea has been to bring both over a few meters (the shower) and a few cm (kithchen) to empty into the barrel to help moisten the material and reconnect to the drain field. (I could change back and forth if need be) I also want to use the barrel to decompost kitchen scrap (mostly cores and peels from fruits and vegetables, wouldn’t have any animal waste). Urine could be collected seperately as it is now. In order to build here I had to put in a traditional septic system. Fortunately, I guess, someone had started one years ago but on the other side of the property (50 meters). I built a small outhouse with shower that drains into the toilet tank and overflows into buckets for tree waterting (by hand). I have yet to use this as a loo, only for the solar heated shower and have been wandering the property randomly fertilizing the area! At night I urinate in a bottle and empty it over the few plants I have and at the base of shrubs. I live here alone. I have no water of my own. I pay my neighbor to pump me 30 mins of his well water into a tank I situated nearest his place which so happens to be at the highest spot on my property. The agreement he made with me is that this water be strictly for personal use. I recently completed a roof catchment system where I have a 1200 Lt tank. This rainy season was terrible! Fortunately I caught all that fell, enough to fill the septic tank and refill the tank again. So water is an issue. I can buy treated water delivered by truck but it would be much more expensive and I would need additional tanks to store it so as to get the whole truck worth. I eventually want to do an aquapontic system and plant a few citrus and fruit trees.
So my questions: – are you still a believer in vermiculture? Is your new system wormless at the source? – would my idea to also compost kitchen scrap, cardboard, paper, leaves, ASH from a fire place, etc ALONG with humanure fit into your system? I read that the worms need a form of grit to help digestion. Is ash going to have any benefit or harm? – any food waste, plants, leaves that would be bad for the system? – how long do you estimate between bucket changes for 1 person (healthy, regular once a day, plus kitchen scrap) ? – how necessary is the ventilation fan? I havent found one here. I could attach a solar 12V computer fan. – I’m imagining a system where I could retrieve the inner bucket from outside by makeing a door on the larger barrel rather than lifting it out through the seat area. Have you thought that idea through? – would combining shower (also solar heated, and bio-friendly sopa) and kitchen grey water be helpful to the system along with separation of urine as much as possible? – any way to share photos?
PS check out my website at https://intensoFuego.com (email: queaviva@gmail.com) Clean burning, high output adapter for wood burners. If you have an interest, I have found a design for a solar water heater that curculates and stores heated water naturally without electricity, made from simple partrs including recycled bottles. It really works! Only requires a day of sunlight to re-heat in the even it’s been overcast for a few days.
On Sun, Sep 29, 2019 at 9:37 PM Sustainable @ Lockyer Valley wrote:
> lockyervalley commented: “Hi Stanley. There was one main reason that we > changed the design design. This was because the outdoor shower/toilet > location is cut into the side of a fairly steep hill, so that the platform > where the two toilet barrels are located is quite small. As a” >
Hi Stanley
Those are interesting and useful questions that you raise. I’ve added my answers through your text below.
Regards
Gordon
I understand the changes you made and they make sense. (Although pictures would be helpful, especially to visualize the 2 bucket configuration and size of the smaller one)
# The original system used 200L poly bins (these ones were originally used for shipping olives). There were two bins, each one fitted with the connections for drain and air flow, and the steel mesh at the bottom as described in the website.
# Now, as I described yesterday, I use a 65L bucket that sits on bricks in one of the original bins. There is only one 65L bucket and I’m using only one of the original bins. It only takes me about 30 minutes to carry the bucket over to the composting trench, empty it and cover with soil and straw, then water the area while also hosing out the bucket, then return it to the toilet.
# There is no reason why it has to be a 65L bucket. Any size bucket will do, because no composting needs to happen in the bucket. You just have to empty a smaller bucket more often.
I would have the same restrictions with space and weight in a cramped space if I followed the original layout. The space under my house exists but only after excavation by hand and reinforcement of the earth with concrete so as to hold the walls around the area from colapsing. My loo location was decided long ago without taking space into consideration and is located a little too close to a crucial post so my concrete work had to be creative and rather precise. In order for you to get a better picture of my idea, in the event you care to respond with suggestions or your opinion…
The location of the loo inside the house places it in a line between the 2 drains of the kitchen sink and the shower.
# If you had the toilet in the house you should probably install a fan in the vent pipe.
Currently I have a grey water gease seperator and leach field.
My idea has been to bring both over a few meters (the shower) and a few cm (kithchen) to empty into the barrel to help moisten the material and reconnect to the drain field. (I could change back and forth if need be).
# If you have it in the house then you will need to keep it as dry as possible. Water is only necessary if you are wanting composting to happen in the barrel/bucket. The wetter it gets without some composting going on, the more it is likely to smell.
I also want to use the barrel to decompost kitchen scrap (mostly cores and peels from fruits and vegetables, wouldn’t have any animal waste). Urine could be collected seperately as it is now.
# We have tried putting vegetable scraps into the composting toilet bin (i.e. the original two bin, composting-in-the-bin system) and it does not work for a lot of reasons. Flies and other insects are one reason. I don’t suggest you go down that route.
In order to build here I had to put in a traditional septic system. Fortunately, I guess, someone had started one years ago but on the other side of the property (50 meters).
I built a small outhouse with shower that drains into the toilet tank and overflows into buckets for tree waterting (by hand). I have yet to use this as a loo, only for the solar heated shower and have been wandering the property randomly fertilizing the area!
# That sounds like the place to have your toilet, unless there are good reasons for not walking to an outside toilet (e.g. very wet and prolonged rainy season, path is too uneven or steep to be safe to walk at night, etc.)
# Why does the shower drain into the septic tank? Septic tanks are for “black” water that may have human health or odour issues. Why not route shower water to a garden bed, fruit trees, etc.?
At night I urinate in a bottle and empty it over the few plants I have and at the base of shrubs. I live here alone.
I have no water of my own. I pay my neighbor to pump me 30 mins of his well water into a tank I situated nearest his place which so happens to be at the highest spot on my property. The agreement he made with me is that this water be strictly for personal use. I recently completed a roof catchment system where I have a 1200 Lt tank. This rainy season was terrible! Fortunately I caught all that fell, enough to fill the septic tank and refill the tank again. So water is an issue. I can buy treated water delivered by truck but it would be much more expensive and I would need additional tanks to store it so as to get the whole truck worth. I eventually want to do an aquapontic system and plant a few citrus and fruit trees.
# We are of the view that roofs and tanks are a really good investment. Water is a necessity of life, and the lack of it limits what we can do in directions such as growing food. What happens if your neighbour leaves and the new one is not cooperative?
# The sooner you can find a way to compost your humanure and food scraps, the sooner you will be free of the need to “waste” water in a septic tank.
# Are you aware of IBCs as a water storage option? 1,000L capacity. They are used to ship all kinds of liquids internationally and after delivery the recipient is often faced with the problem of getting rid of them. They are sometimes given away for sold for a low price. Easy to direct your roof run-off to them. Have a look here https://en.wikipedia.org/wiki/Intermediate_bulk_container. The kind I am talking about is the one in the aluminium cage. Make sure you get ones that have not contained toxic liquids.
So my questions: – are you still a believer in vermiculture? Is your new system wormless at the source? –
# Yes to believing in vermiculture, but we now have a system for our kitchen scraps that is maintenance free and produces worm produced compost that can be incorporated directly into the garden beds.
# The new bucket toilet system does not rely on composting in the bucket because the material is not in the bucket long enough to compost. Putting worms in there would only add complexity and not provide any particular benefit. Worms come out of the soil in the sides of the trench where the composting happens and don’t require any “maintenance” from us.
Would my idea to also compost kitchen scrap, cardboard, paper, leaves, ASH from a fire place, etc ALONG with humanure fit into your system?
# Effective composting, in my experience, is a more complex operation than most people think. Sure, you can toss all that stuff into a heap, and it will break down eventually. But depending on your climate and the materials, “eventually” might be a very long time away. More significantly, much of the beneficial components of compost may have been lost along the way.
# Unless it is a highly functioning worm farm with a large-ish volume, and these materials are mixed into the top layer, paper and cardboard are not a good idea. They need to be well shredded and even then there is a big risk that they will form a solid “mat” that will resist breakdown if they are no well mixed with other material.
I read that the worms need a form of grit to help digestion. Is ash going to have any benefit or harm? –
# I don’t add ash to compost or to worm farms. I stockpile and mix it with finished compost or use it as an ingredient in potting mix, or mix it into the top layer of the soil.
any food waste, plants, leaves that would be bad for the system? –
# Citrus peel, anything from the onion family, coffee grounds or liquid coffee. Don’t believe all the stories about people getting bulk coffee grounds from coffee shops and composting it and adding it their soil. Yes, they do it. No, it isn’t a good idea. Coffee grounds can be incorporated into a vegetable garden but it isn’t simple.
how long do you estimate between bucket changes for 1 person (healthy, regular once a day, plus kitchen scrap) ? –
# Two of us typically take 2-3 weeks to fill a 65L bucket, but the time actually depends more on the nature of the mulch that is added after you poop. Bulky mulch will shorten the time till full. As an example, we usually use barley straw that has been chopped fine by running over it with the lawn mower. Then it is soft and in short lengths. Because of the drought here we could not get barely straw for a while, so we tried sugar cane mulch. It is coarse, long fibre, and takes up a lot of space. The time to a full bucket was halved.
how necessary is the ventilation fan? I havent found one here. I could attach a solar 12V computer fan. –
# Great idea. That’s what we use in a commercial indoor composting toilet that we have and they last for a long time. The toilet is a Sun-mar from north America. It does not work well at all without a heating element in the bottom even in our sub-tropical climate, and it does not really compost well because it dries out the mass too much. We are planning to replace it with an improved version of our bucket system, once we can figure out the design. That will have a 12V computer fan.
I’m imagining a system where I could retrieve the inner bucket from outside by makeing a door on the larger barrel rather than lifting it out through the seat area.
# We solved that problem by having a removable top on the barrel, so that the toilet seat can be lifted off to get the bucket in and out. But in a house you would have some risk of liquid leaking out of the bucket as you carried it out, though I have never noticed that happening in our outdoor toilet.
# Of course, with an in-house system all you need is an outer container to catch the urine that comes through the bucket (and a drain for that outer container that could go to your septic tank, but really only needs to go to a small soakage trench outside somewhere). And of course a seat on top.
Have you thought that idea through? –
would combining shower (also solar heated, and bio-friendly sopa) and kitchen grey water be helpful to the system along with separation of urine as much as possible? –
# That would probably be too much water for a worm farm and definitely too much water to put through a toilet with humanure. And it turns grey water into black water when you put it through the humanure.
# We did, for a long time, run our shower water and the water from our kitchen sink through a 200L worm farm, and found that the compost worms quickly adapt to such a wet environment and thrive. What was really interesting was that the fats and oils in the kitchen water tended to form a mass around the inlet pipe that could have been a major problem, but the edges of that mass had the highest concentration of worms of anywhere in the worm farm, so after it reached a certain size it never got any larger. Our theory is that the fats and oils were being broken down by bacteria and that it was these that formed such an attractive food source for the worms.
any way to share photos?
# There are photos of the old worm farm in a bin system on the web site. I can take some photos of the current system, but don’t have time right now, and all I would be showing you that is different to the outer barrel of the old system would be a bucket with holes in the bottom.
PS check out my website at https://intensoFuego.com (email: queaviva@gmail.com) Clean burning, high output adapter for wood burners. If you have an interest,
I have found a design for a solar water heater that curculates and stores heated water naturally without electricity, made from simple partrs including recycled bottles. It really works! Only requires a day of sunlight to re-heat in the even it’s been overcast for a few days.
And a full comprehensive construction manual behind this link https://docs.google.com/document/d/1rqr1AbMgsU3vO7bFVobTrxZwljqbyc0RXfZflFVpb20/edit?usp=sharing
Hi. Thanks heaps for posting the specs and instructions for your worm compost toilet. I’m a total ignoramus beginner moving onto an isolated bush block in the middle of nowhere and appreciate your sharing that info very much. Best wishes. Sherry.
I just came across something that I posted on Redwormcomposting last year that adds some detail on management of composting toilets that people might find useful:
We have been very successfully vermicomposting our 200L resting composting toilet bins for a few years now. With just the two of us it takes about 8-10 months to fill a 200L bin, so that is how long the worms get to work their magic. In general they have produced a fine brown loam after this period, but it does take some monitoring and sometimes some inputs. One of the keys to success has been to pay attention to getting the composting going in the bin while it is in use.
We use sugar cane mulch as the filler in the toilet and damp this down with water from a spray bottle kept beside the toilet. Because it is such as simple system (a 200L recycled olive barrel, outdoors, with a ventilation structure built in that allows air to be drawn down through the mass then out and up to a vent) we are able to monitor the appearance of the top of the “mass” in the bin. Easy to see if it is getting too dry, for instance.
About three or four times during the use period we use a stick or long-handled small garden fork to level off the mass, then cover it with about 50mm (2 inches) of compost from the compost heap. This introduces composting organisms (bacteria, fungi). We also make a point of adding mature fungi found growing in the compost heap to the active bin – and usually have a few crops of mushrooms come up on the mass, showing that they are doing their job below the surface. This provides the “pre-composting” that Bentley advocates, and helps to ensure that by the time the bins have to be changed over the mass has been fully composted.
We also put in a bit of the top layer of worm castings from the resting bin, to introduce worms via eggs). Our experience with a range of vermicomposting systems is that Bentley is correct in saying that worm populations adapt to the food and medium on which they are raised. Usually by the time the bin is full there is already a healthy population of worms at work.
It is necessary to make sure that there is an effective urine drain on the bin to stop it accumulating ammonia salts, and this then functions to drain off excess liquid during the resting vermicomposting phase – great stuff to make “tea” fertilizer, diluted about 5-10 times. I swear sometimes it seems like we can see the plants growing in response to this stuff.
Also important to make sure that no one using antibiotics uses the toilet – plays hell with the composting process and possibly also the worm population.
During the resting vermicomposting phase it is important that the mass is monitored to ensure that a) other organisms aren’t getting in there that might conflict with the worms, or become a problem in the surroundings. (Black soldier fly larvae are not a problem – they seem to co-exist with worms quite well, and to speed up the composting, as well as keeping away larvae from other species). It is important that the mass is ventilated – to prevent anaerobic conditions developing, but not so much that it dries out. We cover the top with damp newspaper layers, but don’t get too anal about checking regularly to see if they have dried out. We occasionally add the kitchen scrap bin to the top of the mass in the early weeks, just to encourage the worm activity in the top layer, but after a month or two the top layer will be worm castings, and all of the activity will be going on deeper down.
In our climate (warm temperate, east coast Australia inland from Brisbane) an outdoor black plastic bin runs the risk of overheating in summer, so we wrap it in several layers of cream-coloured shade cloth in the hottest part of the summer. In winter the mass tends to generate its own warmth). The active bin is shaded by the resting bin in summer, so there is no need to insulate it – interesting too that one way to judge whether the composting is “going” in the active bin is to put a hand into the space in the top of the bin early in the morning – an active bin creates quite warm air above the mass.
You can see other comments in the thread here: http://www.redwormcomposting.com/worm-composting/human-waste-vermicomposting/
Have enjoyed your posts including this one. Unfortunately my comments on several failed on the website entry after the email and name fields. There seems to be a bug in the wordpress system. I worked on Tinian, have a block on Mt Crosby Rd and agree with your observations on Leucaena. Also have observations on composting toilet with a very simple installation using a hydromulch absorbent with a high sugar content in the Crosby shed. A long comment on wicking beds some weeks ago went astray. No problems in my limited experience with anaerobic breakdown as biochar is used in the water reservoir. Finally, I share your interest in renewable energy. I would be happy to expand by email. Yes you have more readers than your wife and daughter!
Druce Batstone: druceb@tpg.com.au
Hi Druceb. Thanks for your comment, and for persisting in establishing contact. I wasn’t aware of the bug in WordPress but that could explain the almost total lack of comments, though I had been putting it down to my lack of networking on other blog sites to generate readers – the usual lack of time. Amazing overlaps in our histories and interests – there aren’t too many people in Australia who have worked on Tinian, and I used to own a block of land on Kholo Creek, on one of the streets off Mt Crosby Road, then there’s obviously a shared interest in sustainable systems.
I’d love to have your comment on wicking beds, I’m finding that there are issues with using them long term but suspect that I’m not putting in the requisite effort such as monitoring pH (never got around to it), regularly changing water in the reservoir (which I think is just commonsense “hygiene)”, and I’ve never found a way to add nutrient that I’m comfortable would not cause problems. Some plants seem to take to the wicking pots, but others start out well then go “off” including ones like kangkung (water morning glory) that should do really well in the wet environment. Would you mind trying to post it here again so others can share the discussion, and if that fails then via email (I’ll email you after I finish this reply so that you have my address).
What is the “hydromulch absorbent” you use in the composting toilet?
Look forward to hearing more.
Apologies to WordPress as clearly the comment system works. The problem was dealing with an automatic entry for a personal website that cancelled the comment when the entry was highlighted to delete with a backspace keystroke.
Re: “hydromulch absorbent”; the product was made from 70% dried sugarcane stalk and 30% waste paper that was shredded and baled for mixing with water, fertilizer and seeds for slope stabilisation. The product has a fairly high sugar content (typically more than 20%) with a nice molasses smell. I had noted the recipe for a “starter mulch” for the BioLet system (http://www.biolet.com/support/articles/biolet-60-xl-owners-manual/6.php) that had molasses as an ingredient. The shed toilet does not get much use so I made up a simple dry composting unit from a low-set plastic bin on wheels. Hydromulch is added after each use. So far no smell and no flies.
Re: wicking bed observations; my experience is limited to two above-ground beds that have been producing for about 9 months and in-ground beds that have just been planted with potatoes, broad beans, peas and garlic. Your November post mentioned problems with tomatoes and basil that you attributed to anaerobic decomposition in the saturated layer. Like you, I was concerned about decomposition of stuff like wood chip in the water reservoir. My solution was to use charcoal as the reservoir wicking media around socked agi pipe (to increase the void volume). The reservoir was wrapped in geotextile fabric in the elevated beds. The growing media was compost and weed-free builders loam. Vegetative growth remains excellent. I over planted. Thai and sweet basil grew like a hedge. The first crop of tomatoes (from seedlings) was disappointing. The current crop from seed planted in place is much improved. My zucchini, like yours had plenty of flowers, but female flowers failed to set fruit. Eggplant, silverbeet, lettuce, parsley, sage, Chinese greens, garlic chives have done well. I do not anticipate the need to drain the water reservoir. The side wall of one bed failed with loss of water from the reservoir. The undrained bed and drained bed behave the same. Both were replenished by rainfall and by water addition through a standpipe linked to the agi pipe. Water that overflows from the reservoir after heavy rain looks like compost tea. Any that I collect is used to good effect on a few plants not in wicking beds. I am not sure that ” hygiene” is especially significant if the water holding media does not decompose and the growing media above is well aerated.
The side wall failure and general reading on permaculture got me thinking about in-ground wicking beds. As you know, the Mt Crosby blocks are hilly. Mine especially so. With 5900 square metres on plan, there’s no great need to build raised beds on limited level ground. The in-ground wicking beds form terraces on a cut slope. Again, I have used charcoal and agi pipe as the water reservoir. The plastic liner is protected by sandwiching in two layers of carpet. A third layer of carpet separates the reservoir and growing media.