Dealing with black spot fungus in pawpaw / papaya

Last year we reluctantly pulled out the last of our pawpaw trees.  This was because we were not able to keep the black spot fungus under control sufficiently to be able to harvest fruit of a quality we were prepared to eat.  It was a very difficult decision because there is nothing more delicious than a tree-ripened pawpaw.

This tree and another which we dug out few years back were planted ten years ago and probably gave us about a tonne of fruit over that time.

The black spot fungus didn’t show up in the first 2-3 years, and during that time it was not unusual to have more than 20 fruit on each tree at one time, and to harvest a fruit every couple of days at the height of the season.

However, once the fungus became established for many years we were harvesting smaller than normal fruit which did not have the full “ripe pawpaw” flavour and was infected with white spots which we cut around.

We tried a range of approaches to controlling the fungus, including spraying with wettable sulphur and Seasol.  Unfortunately without any clear guidance as to how often to spray, and without any certainty that these were the correct measures to take, combined with long periods away from home, we didn’t persist with any particular regime.

However we did get the impression that both the sulphur and the Seasol had some beneficial effect, but only in the presence of good soil health and regular fertilizing.

Today I came across a post on Jerry Coleby-Williams’ website on how to fortify your pawpaw plants to better withstand the effects of this exotic fungal disease caused by the fungus Asperisporium caricae.

What he recommends is a combination of:

  • spraying with wettable sulphur  monthly from (February to October);
  • regularly removing severely infected leaves and fruit and all fallen foliage (all year round);
  • removing old mulch at the end of autumn and replacing it with fresh; and
  • maintaining the overall health of your pawpaw by a combination of good drainage and modest but regular feeding.

Jerry emphasises that well nourished pawpaws are more important for disease control than spraying. Go to his website to see what he prescribes in detail, particularly the advice on the  nutritional requirements for pawpaws.

Pruning Dragon Fruit

I have to admit that I have not found good information anywhere on how to prune Dragon Fruit.  What I am going to tell you here is a result of my own “trial and error” approach over several years.  It seems to work for me, but who knows whether there is a better approach that I don’t know about that might yield a whole lot more production.

Our plants are around 4 years old and last year they produced over 40 fruit (I stopped keeping records after 40, so the total could have been over 50).  Probably because of our cool and dry winters our Dragon Fruit go dormant in the winter, with very little new growth and no flowers.  Fruit is produced between January and June.

Three days after flowering

Three days after flowering

We had the first bud on our three plants on 6 December, and it flowered on 18 December this year, though I didn’t get around to photographing it until yesterday (21st).  This was three weeks earlier than the first flowering last year.

On the 20th I carefully counted all the buds that had appeared since the 6th – in two weeks we had gone from one bud to 29.

These plants were partially pruned in November, but then I got too busy to finish the job.  But this has given me the chance to think about the effect the pruning might have had on bud location, though this is all guess work and observation – no evidence-based theory here.

A range of buds, from just appeared to on the way to flowering

A range of buds, from just appeared to on the way to flowering.  Note the ants on the bud.

What I am seeing this year is similar to what I have observed in other years.  The most buds (by far) appear on downward growing branches.  In addition, there are far more buds on branches that have been pruned (whether the pruning was done by chopping off the branch through the green section or cutting it off at a node) than on un-pruned branches.

As you can see in the photo above, ants take a great deal of interest in the buds, but they do not seem to do them any harm.  I suspect that the buds exude something that is useful to the ants, and maybe in return the ants discourage insects that may be harmful to the bud.  Does anyone have any information on this?

The photos below show buds formed near the pruning point, however not all of the buds on a pruned branch are this close to the pruning point.  Nevertheless, as I said above, by far the most buds are on pruned branches.

It doesn’t seem to matter whether the pruned branch has grown some more branches at the pruning point.  Many of the branches I pruned in November have done this, but they still have buds on the pruned section – and not on the new, un-pruned branches.

Another factor to think about (maybe before you plan your Dragon Fruit planting) is whether you will grow them on poles with spreader frames on top or horizontal beams.  You can see a short discussion here.

If you are just starting out with Dragon Fruit, remember that they should not be pruned until they are at least one year old, and ideally not until they have had one good flowering and fruiting season.

Would you like to share your pruning techniques here, along with your observations on the results?

If you are looking for more information on Dragon Fruit, have a look at the links at the end of the this post from the end of 2014.  And if you want to see the layout of our vege garden have a look at the two plans in this post. The first shows how the vege garden fits into the overall plan on our narrow ridge top.  Scroll down for a more detailed plan of the vege garden.  The Dragon Fruit are growing in Hugelkultur Shadehouse No.1.

p1060446_crop-small

Branch pruned at the node

p1060317_crop-small

Bud a few days old. The ants seem to take an interest in them right from the time they form

A bud right at the pruning point

A bud right at the pruning point – chopped through the green section

p1060442_crop-small

Branch pruned by chopping through the green section

City farms and small producers at threat from trade agreements

Last night I was reading something about the Australian Government’s new trade agreement with China and thinking about the Trans Pacific Partnership trade agreement that the Abbott government has been salivating over in recent times.  That started a train of thought that went via Greece (the degree of resilience that connections many in the population still have with farms) and then to the opening up of Cuba to the US (and how that might impact their low input, small-scale farming).

This morning I opened up The Conversation and there’s an article on the way that better relations with the US might threaten Cuba’s “sophisticated urban and suburban food system [that is] producing healthy food, improving the environment and providing employment.” But what is under threat is more than that – the organic urban production model is being taken up in the countryside as well.

12698826744_0aee3c7c16_n

The world still has many lessons to learn from urban and peri-urban agriculture in Cuba. Javier Ignacio Acuña Ditzel/Flickr, CC BY

The Cuban example has been an inspiration to many in both the developing and developed worlds, with two-way sharing of approaches to sustainable agriculture on pretty much a global basis.

The article paints a fairly detailed picture of the background and significance of Cuba’s current agricultural system, and the way that it has developed over more than 20 years, initially responding to the cut-off of Russian aid, including particularly fossil fuels.

Well worth reading, both for the detail on the Cuban approach and as material to think about in terms of the free trade arrangements that are proliferating internationally.  You might also want to check out the much more detailed background to Cuban agriculture in the 340 page publication Sustainable Agricultural Resistance: Transforming Food Production in Cuba published jointly by Food First Books, ACTAF (Cuban Association of Agricultural and Forestry Technicians) and CEAS (Center for the Study of Sustainable Agriculture, Agrarian University of Havana)

Wicking pot maintenance and a recycling experiment

Over the last few weeks I’ve been gradually doing some “maintenance” on the wicking pots.  They have been a bit neglected since we started getting good rainfall at the end of last summer.  I had a lot of work to do to construct raised beds in the shade tunnels, and over winter these were generally more productive than the wicking pots as well as representing a much larger surface area for food production.

However the low rainfall over winter, and the lack of any signficiant rain for nearly three months has meant that we have to start managing our water supply (all rainwater in tanks) even more carefully than usual.  I’ve almost stopped watering the raised beds, and at least half of them are under a thick layer of barley straw, with nothing growing in them. It’s at times like this that the wicking pots come into their own.

The ongoing maintenance of the wicking pots amounts to regular fertilizing with alternating applications of worm tea (diluted to 50%), cow manure tea (10%), and (especially for leafy crops) diluted urine (10%).  They also get occasional surface applications of the sludge from the cow manure tea production, and of course regular topping up of their mulch to control evaporation.

Over time I find that the soil in the pots becomes somewhat “compacted”, and some crops establish such a dense root mass that it is nearly impossible to dig into the soil.  These issues are evident from a gradual decrease in their productivity and in the “health” of the plants.

Thai Basil_Wicking Pot_P1020245_20141119_small

Thai Basil and Spring Onions. The basil has already gone to seed after a long period of lush growth. After harvesting the seeds I pruned it to stimulate some new growth, so as to get more production before I am ready to replenish the soil.

Spring Onions_Wicking Pot_P1020244_20141119_small

I’m not sure how long these Spring Onions, Clumping Leeks and Clumping Shallots have been in this pot – it’s certainly more than 18 months. They’ve been harvested regularly by cutting the stems off at soil level. Now they’re starting to look a bit tired, so I’ll replenish their soil in the coming weeks.

For these reasons I like to take out the soil every 12-18 months and combine it with a mix of sandy loam from the drains on our access track, chipped horse manure, and fresh compost.

Wicking Pot_mint&kangkung_P1020239_20141119_small

This pot was rejuvenated in early September (about 12 weeks ago) and planted with Kang Kung (Ipomoea aquatica) and Mint (on the left, partly obscured by the asparagus). Both have grown rather extravagantly, the Kang Kung more so than the mint because it responds to harvesting by becoming even more productive. The Mint was a bit of a mistake because I just noticed that it is popping up throughout the whole top of the pot – that’s what mint does, I just forgot about it. I removed the mint after taking the photo.

The experiment mentioned in the heading of this post refers to an attempt to find a way of using discarded “florist pots”.  These come in various sizes and are like an overly tall plant pot without any drainage holes.  Florists keep their cut flower stock in them.  They are too tall to use as plant pots because the top of the soil gets dry while the bottom is still saturated.  So I thought I’d do a quick experiment to see how they go as wicking pots.  I just drilled four drainage holes around the sides about 250mm from the top, stuck a 500mm bit of offcut plastic water pipe down the side, filled up to this line with charcoal (leaving a depression so that the soil layer extends below the drainage holes) covered it with geotextile and added potting mix.

All I had available to plant in them was some Lemon Grass that I had to move out of a raised bed, so I put single stems of that into three of these wicking pots and also into three normal plant pots.  Four weeks later two of the wicking pots have thriving clumps of Lemon Grass (the third has been a bit slow to get going) whereas in the normal plant pots it is struggling to survive.  All have been given applications of diluted urine.

Lemongrass_Wicking Pot_P1020261_small

Lemon Grass thriving in a simple wicking pot. One of the four drain holes is visible. I won’t leave it in this pot because it isn’t wide enough to let the Lemon Grass grow into a large and productive clump, but it shows that the principle works.

The “funnel” makes it easier to fill the intake and also helps to reduce evaporation.  It’s a recycled thread spool from Reverse Garbage in Brisbane.

You can see my original long post on making wicking pots here and a modification of that design here.

Do you have any novel ways to share for making or using wicking pots?  What kinds of veg do you find grow well in them?


Coal Seam Gas and the Gatton Star Poll on Mining in the LVR

LVR Mining Poll in Gatton Star - results 13 NovWOW!  This is the score at 9.30pm on 13 November.  Three days ago, when I wrote the last post and pointed readers to the poll the ‘No’ vote was 84%.  Well done people.

If you know of anyone who might not have voted on this, please ask them to use this link to register their opposition to coal seam gas exploration or extraction in the Lockyer Valley Region:

http://www.gattonstar.com.au/polls/2014/11/06/do-you-support-mining-lockyer-valley/

Let’s keep these destructive activities out of the Lockyer Valley Region – not just the productive farmland in the valley bottoms, but the ridges and forested areas as well.  This industry is far too impacting to be allowed anywhere near our farms, homes, schools, businesses, or natural environment areas.

You can check on the latest poll figures here:

http://www.gattonstar.com.au/polls/2014/11/06/do-you-support-mining-lockyer-valley/results/

The Coal Seam Gas Meeting in Grantham on Sunday 9 Nov.

We went to the Lock the Gate / LVRC  /LVRC Ratepayers meeting on coal seam gas at Grantham yesterday.  A very well organised event, with a large turnout from the community and some very good speakers and a broad range of topics covered..  This can be seen as the first major step (I know there have been other initiatives) on the path to galvanising public opposition to coal seam gas exploration in the Lockyer Valley Region.  The organisers deserve our congratulations and thanks for their efforts to bring people together to hear the message.

There’s certainly not only already a large local opposition to the idea of even exploration for CSG in the LVR, but also existing connections to anti-CSG campaings elsewhere. Both are sure to grow rapidly.

Just an idea: maybe a local group could be called Lock Yer Gates?

One of the things that we found out at yesterday’s meeting was that there’s an online poll running on the Gatton Star website.

The question being asked is:  “Do you support mining in the Lockyer Valley?” which is kind of a dumb question in the sense that in general usage the term “mining” covers a whole range of activities from quarrying road base through architectural sandstone extraction to open-cut coal mining.  However I think that in the current climate we can take it as a proxy question for “Do you support coal seam gas activities in the Lockyer Valley Region?”

From the latter point of view I think that the current tally for the poll (84% No and 15% Yes) is likely to be unrepresentative of the views of the community.  But the poll isn’t closed yet.

Since there are likely to be those (conservative politicians and mining companies spring to mind) who will tout the result as reflecting community views on coal seam gas if it seems that we are divided as a community, I think that it is really important that as many as possible of us with strong “no” views to vote.  Other communities throughout the country have polled 90%+ against (probably with better-worded poll questions). We can do the same here.

Here’s the web address for the poll:

www.gattonstar.com.au/polls/2014/11/06/do-you-support-mining-lockyer-valley

The coal seam gas industry (and our political masters) need to be told loud and clear that there is no social licence whatsovever for CSG operations in the Lockyer Valley Region.

Please, spread this message among your friends.

Growing Dragon Fruit from cuttings and looking after your growing plant

This post is a work-in-progress compilation of material on growing this delicious and low maintenance fruit.  I will edit it from time to time as I come across more/better material.

[Sunday night Oct 5: Have just revised the links at the bottom of this page – quite a few useful sites there now]

[October 6: added table of nutritional values of pitaya, added photos and associated text, added new links to source]

Our Dragon Fruit Experience

We started out with some cuttings of red dragon fruit in 2010 or early 2011.  They grew successfully in large pots, but we didn’t have anywhere where we could plant them out, so they stayed in the pots for ages, with some eventually extending roots through the bottoms of the pots and into the ground.  These plants are nothing if not hardy.

Three of them were planted out on a beam trellis in a shade tunnel in mid-2011 (the 30% shade cloth on these tunnels is extended only during the hotter parts of the summer).

DSCF3647_150212 crop_small

First dragon fruit bud – February 2012 – while the plant was still in the original pot

Two buds were produced in late summer 2012 – probably in late summer because the plants were not sufficiently established to flower earlier that summer.  Neither of these produced fruit.  In the 2012/13 summer we had two flowers and two fruit.

In October 2012 one-third of the floor or the shade tunnel was dug out to a depth of 200-300mm and filled with dead timber, including tree trunks, branches, twigs and leaves, and chip mulch from our annual firebreak clearing, then covered over with the soil taken out of the hole (or rather the two-thirds of the soil that remained after the rocks had been sieved out)  to make a modified heugelkultur/raised garden bed.  That’s the lush area in the background of the photo below, 10 months later.

P1060073_290713 crop_small

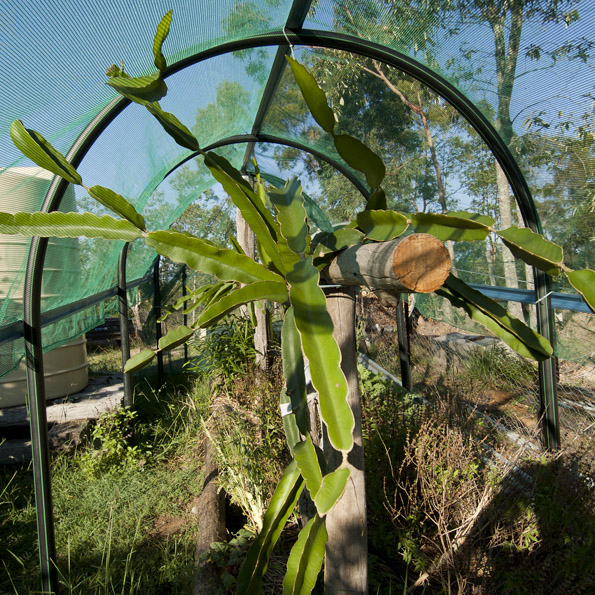
One of the dragon fruit on the trellis – late July 2013.  This shot gives you an idea of the post and beam trellis.  It actually recommended for red dragon fruit, but I fail to see why, and I know a commercial grower who has changed over from this to post and frame trellises.

In late July 2013, just before the photo above was taken, the remainder of the floor of the shade tunnel was turned into a modified heugelkultur bed.  The raised bed on top of the timber was a lasagne bed with layers of straw, poultry manure (including quite a few carcases), and compost.

By late December 2013, only five months later, the dragon fruit had responded dramatically.

P1060273_211213_crop_small

The same plant as above, but five months later (there is a second plant growing up the post in the background, but the branches here are from the one in the foreground).

We eventually had seven fruit from nine flowers on four plants from the 2013/2014 summer, harvesting the last of the fruit in May and June.  One fruit didn’t develop, and one was on a new plant growing out in “possum land” beyond the electric fence and was eaten by the possums before it was ripe.

DSCF4472_120414 crop_small

The same plant in mid-2014 prior to pruning

In hindsight it was really dumb to plant dragon fruit above a vegetable bed inside a rather narrow shade tunnel.  These things need to be able to grow as wide as they want, and they need to have a combination of old and new branches hanging down (fruit comes from both).  It just doesn’t work, and forgetting that the vines are there and standing up under one to get one of those small spines in the soft part of the ear is not fun.  As soon as we get an extension to the garden fenced we will be planting lots of dragon fruit there, from cuttings off these plants.

Propagating via Cuttings

While it is possible to propagate dragon fruit from seeds, it is along process and does not result in a vine with the same fruit producing properties as the parent.  With the cuttings you are getting a clone of the parent, and much more quickly.

You can make multiple stem cuttings from the one piece of stem, but focus on the lower and middle portions of the stem (away from the growing tip) to get the most robust material.  If you have an “intermediate” section of stem with narrow stem portions at each end, then it probably doesn’t matter where you take the cutting.

Try to use a stem that is a few inches in diameter (> 2 inches), but smaller stems will work – the danger is that the stem may dry up too much when being “cured” or before it produces roots in the pot. Thicker cuttings suffer less stress.

When you make a fresh cutting, it’s best to place it in a shady location for a week or more to allow the cut end to dry and “heal” to avoid fungal infections, before placing it into soil.  You may see roots starting to develop during this period, but it is not necessary to wait for roots before potting the cured cutting.

Thereafter, a good, well-drained potting mix will serve to encourage roots to grow.

Water once every one to two weeks and let the soil dry up, too wet can cause fungus attack.  Keep mulch away from the base of the plant to avoid introducing fungi and rot.

With filtered sunlight and warm temperature, the vine will grow a root first, then, once the root is established, new branches will sprout from the nodes.

When new growth appears (this may take as long as four months, depending on the weather and season) they are ready to plant in the ground in a sunny location.


Growing the Mature Plant

Dragon fruit need to grow up a trellis, but they need to be able to “hang” their side branches out from the main stem (or from a beam or frame on top of the trellis) in an arc.

Remove lateral growth until the stems reach at least a few feet up their support. Then you can prune the tips of the stems to induce multiple branching, and eventually, fruiting.

This cactus develops some pretty thick and heavy stems, so your support will need to ultimately hold quite a bit of weight. Use twine or bands of fabric to help attach it to the support, avoiding wires that can cut into the weighty stems.  Eventually the stems will grow aerial roots to grip onto the support.

5c29be08eea3ced720eb704e7bd9a518

A man inspects dragon fruit trees on a plantation in rural Cambodia. Photograph: Heng Chivoan/Phnom Penh Post: 30/7/12

This plant is very efficient because it can grow roots on any surface. It can also absorb water and nutrient through any surface. It can also utilize low light or partial shade but it grows better in full sun. BUT be careful when the plant is moved from low light to full sun – on very hot days the vine can sunburn easily.  Growth and fruiting are better in full sun (and the plant needs at least half a day of sun), but in the hotter part of summer I use 30% shade cloth.

Flowering, Pollination and Fruit Development

The main flowering is in summer and then fruit develop into autumn and winter, however the time taken to reach maturity depends on the size of the fruit, so from flowering to ripe can be as short as six weeks or, more usual, several months.

[Need to add more information here]

Feeding Your Dragon Fruit

Dragon fruit needs low nitrogen and high phosphorus in the soil, particularly as it approaches, and during, the growing and fruiting season.  They “hibernate” in winter in our climate.

Pruning

When your plant is at least one year old, strong and vigorous, and ideally having proven its ability to bloom and fruit abundantly (this may take 18 months to two years in our climate), you can begin to take stem cuttings.  Because the plant needs to be pruned once it is mature and has fruited (in order to produce many new side stems and therefore many fruit) you will have an opportunity every year to make cuttings from the pruned material.

It is on the new branches sprawling over the top of the support structure where most of the new flowers are produced, although flowers can pop-up anywhere on the plant.

The Nutritional Value of Dragon Fruit

Nutritional Value of Pitaya

Click on the table to go to the source at: Dragon Fruit: Nutritional Value, Health Benefits and Calorie Count for more information

 Some useful links

NT Government AgNote D42: The Pitaya or Dragon Fruit A four-page technical note on key aspects of cultivation.

NT Government Growing Note: Pitaya (Dragon Fruit) One-page note with some material not covered in above AgNote

Dragon Fruit Production Guide (Pinoy Bisnes Ideas) A lot of good information, some of it in more detail than the above publications.

Pitaya Growing in the Florida Home Landscape  One of the most complete sources I have found on growing dragon fruit.

Dragon Fruit (Pitaya) – How-to Guide for Growing   Includes a video on hand pollination.  A very good source of information on growing dragon fruit, with some information that I hadn’t seen elsewhere.  This is actually an Australian self-sufficiency website, and the author is based in South East Queensland.

Pruning Pitaya (Dragon Fruit) (Sub-tropical Fruit Club of Queensland Instruction with photos for pruning. Use the search box on this page “pitaya” for a huge amount of useful/interesting information on Dragon Fruit

Dragonfruit Cactus (Botanical Growers Network publication) Some of the information fills gaps in the above sources, or gives a different slant on some topics.

Improved Production Technology for Pitaya (Philippines Bureau of Agricultural Research) Check info on when to prune, time to first production and time from flowering to harvest.

http://dragonfruit.foodlywise.com/ An annoying site because of its strange links but there’s some good information if you can figure out how to follow them.

http://dragonfruit.foodlywise.com/how_to_grow_dragonfruit/growing_dragonfruit_commercially/growing_dragonfruit_from_cuttings/dragonfruit_stem_cuttings/  Covers several aspects of growing dragon fruit from cuttings.

http://www.vivapitaya.com/dragon-2.htm A selection of photos of dragon fruit growing in different circumstances – some ideas for supports, and indications of what healthy plants look like in the tropics.

Turning the compost heap for the first time

Back in late August I described the process of putting together an 18-day compost heap.  That heap was made on August 26.  When I measured the temperature on August 30 it was just over 50 degC.  I suspected at the time that the temperature had been higher during the four days in between, because of the amount of green vegetable matter used, but I couldn’t be sure of this.

On September 5 I turned the heap for the first time, but before turning it I checked the internal temperature – 52 degC – still within the thermophilic phase of composting(1) where composting is at its most rapid and is bacterially dominated.  The thermophilic phase occurs around 40-65 degC and at these temperatures pathogens and weed seeds will be killed, but “heat loving” organisms will thrive.  Above 70 degC it is necessary to start thinking about reducing the temperature so as to avoid death of the beneficial composting organisms.  This heat is being produced by the metabolic processes of the organisms doing the composting, so it is good to see that they have been hard at work for a week or more.  The fact that it is progressing so well indicates that, during the time I wasn’t taking measurements, the temperature didn’t get into the 70+ degC, or at least not for any appreciable time.

P1060746_050914_just started_small

Part way into turning the heap. It looks a long way away from the original heap, but that’s caused by the camera lens. In fact it is a comfortable reach from one to the other with the long-handled manure fork.

The first surprise was the extent to which the original heap had subsided – it was right up to the top of the frames in the background. I should have expected this, for two reasons: first, the green material was pretty coarse, so there would have been a lot of air spaces in the heap to compact down under the weight of the overlying material; and second, that green material made up a large proportion of the heap, and once it started to break down there would have been a lot of water released, thus reducing its volume.  It is still well above once cubic metre, which is roughly the size required to reach and maintain hot composting.

You can see that a lot of the drier/harder materials have only started to break down, but what isn’t so obvious is that the vast majority of the original green material is difficult to identify – this is after 10 days of composting (in true 18-day compost procedure the first turn would have been after four days, but I did warn in the earlier post that this would be “more or less” 18-day compost).

What is important, but not obvious from the photo is that the heap generally had a good water content, though of course the outer layers (and in this case the bottom layer too) were on the dry side.  I had a hose handy to water both the working face of the old heap and the new heap whenever I came across material that was too dry.  A heap at this stage is too wet if you can squeeze water out of a handful of material, and too dry if a hard squeeze cannot produce any “cohesion” of the material (it doesn’t have to produce wet clumps, just some cohesion resulting from its wetness).  If in doubt, a bit too dry is way better than too wet, because too wet leads to anaerobic processes.

P1060752_050914_fungused chip mulch on top_small

The edge of the new heap as it grows. Key things to note are: (a) the mix of fine and coarse material, (b) that some of the material is loose and dry (I need to water the heap before adding more), and particularly (c) the fungus-matted material on top of the heap.

The first thing I noticed was that there is quite a bit of woody and dry leaf material.  The woody stuff is expected because of the use of coarse mulched tree material from under the power lines in the area.  The bigger bits of this won’t break down fully in an 18-day cycle, but they will during the later “maturing” phase of fungal-dominated composting.  Among these larger components was a matrix of fine material well on the way to becoming compost; this would have derived from the green vegetable waste and the matured broiler manure.

The second thing, and this was a bit of a surprise, was that the 20cm of chip mulch base which had been in the bin for a couple of weeks before I made the heap had become fungus-matted, rather like tempeh (the Indonesian fungus-impregnated soya bean delicacy).  You can see where I’ve thrown this material onto the top of the new heap in the photo above.  Clearly the temperature at the bottom of the heap had not gone high enough to kill off the fungi but was within the mesophilic range (25-45 degC) where fungi are encouraged.  Here’s a close-up of that material.

P1060754_050914_fungus matted detail_small

Fungal-matting of some of the chip mulch which had been on the bottom of the original heap.

This material provides a lovely base of fungal inoculation of the heap, so I made an effort to include it in as many layers of the new heap as possible.  I did worry a bit about the possibility of “matting” of these clumps into impervious layers, rather like paper tends to do in a compost heap if you add too much in one layer and make it too wet.  All the more reason to spread it through the new heap as much as possible.

That reminds me – it is very important when you are making or turning a hot compost heap to keep it “fluffy”, i.e. to incorporate as much air as possible, because without air the (aerobic) organisms you want to do your composting can’t survive.  They will be replaced by anaerobic(2) organisms, and where these dominate they produce intermediate compounds including methane, organic acids, hydrogen sulphide and other substances. In the absence of oxygen, these compounds accumulate and are not metabolized further – many of them have strong odours and some are phytotoxic (poisonous to plants(3)).  One of the things I like about my long-handled manure fork is that it is very easy with a flick of the wrist to turn a forkful upside down as I throw it onto the heap, thus loosening it up as it falls.

P1060762_050914_closed heap_small

Putting the loose straw cover onto the heap to keep it from drying out while still allowing air to circulate.

So that’s it.  With the heap covered with a thick layer of loose straw it can sit and do it’s thing until the next turning.

The open area in the back of the above photo is where I can turn the car when I’ve got a trailer behind.  In the background are the sections cut out of an old water tank that had been through a bushfire.  These now hold maturing broiler manure and horse manure.

(1) There are many good sources of information on the stages of composting and the factors affecting the process.  For a quick overview of the main points you can go to the Cornell Composting web page.

(2)  Misra, R.V., R.N. Roy and H. Hiraoka (2003). On-farm composting methods.  Land and Water Discussion Paper 2. FAO, Rome.  [This publication has details on many composting techniques, including a number of anaerobic methods.  You can download the whole document here].

(3) Brinton, W., & Trankner, A. (1999). Compost maturity as expressed by phytotoxicity and volatile organic acids. In Orbit-99 Conf Proceedings, University Bauhaus Weimar. Retrieved from http://www.solvita.com/pdf-files/voa_eu2.pdf [Gives some idea of the potential for composts to become phytotoxic and the compounds involved].

It must be Spring

DSCF4777 copy_crop_small

Native bee (Tetragonula carbonaria) on a Radish flower. Note the full pollen sacks on its hind legs.  These radishes have taken ages to actually get to the flowering stage (with bulbs now the size of small pumpkins) but with the help of these bees we look like getting plenty of seeds.

I was out in the vege garden early yesterday morning and suddenly realised that I was seeing far more bees than I had for a long time.  It was early enough that the native bees greatly outnumbered the European honeybees.  Our social native bees get up much earlier than the foreigners.  I think it was Tim Heard (“Mr Native Bees” in this part of the world) who first put me onto this at one of his one-day workshops.  Whoever it was told the story of the researcher who was looking into the pollination of the vast Macadamia nut orchards in northern New South Wales and discovered that by the time the European honeybees had got out of their (expensively rented) hives, the Macadamia flowers had already been pollinated by local native bees.

The bees I was watching yesterday were Tetragonula* carbonaria, one of more than 2,000 species of native bees in Australia, and one of only ten social species among the Australian native bees.  We also regularly get Blue-banded Bees (Amegilla cingulata) in our garden (a solitary species), and I’m sure there must be many more that I haven’t noticed yet.

There were a lot of flowers for them to choose from because I’m letting a lot of things go to seed, like Loose-leaf Lettuce, Radish, Amaranth, Ceylon Spinach (can you stop it from going to seed?), and a whole range of Asian Brassicas.

DSCF4787_crop_small

Working hard in the jungle world of a Spring Onion flower (the bee’s colours may be a little off – I was pushing the image to its limits in early morning light and using a hand-held camera)

You can find useful links to information about Australian native bees here.  If you are interested in the reasons for the recent change of the name of the Trigona genus (to which our small native bees used to belong) to Tetragonula there’s an account here, with links to even more information.


Starting a batch of 18-day (more or less) compost

I just spent a morning putting together a batch of compost.  Four hours of solid work, from getting the green waste that is the basis if this batch to capping it off with a fluffy cap of straw.

The green waste came from a vegetable packing shed, where I had to line up with all the farm utes picking up a load of cattle feed (we’re in a drought, despite the reasonably good rain in the last couple of weeks).

Having heard figures of up to 40% of horticultural production being rejected because it does not meet supermarket specifications for colour, shape, size, etc., I had always imagined that there must be a huge amount of green waste going to landfill from packing sheds.  It isn’t true, at least not here in the Lockyer Valley.  Some of the big farms that have their own packing sheds also have their own cattle herds, and these get first call on the green waste.  The others generally make it available to the public, and from what I’ve seen very little or none goes to landfill.  The farmers are eager and grateful to have this source of animal feed.[*see additional note below]

When you think about it, these farm animals are eating better than those of us who shop at supermarkets.  Picking of the vegetables commences early in the morning, and the green waste starts coming out of the packing shed around 7.30am.  There might be a bit of waste from the previous afternoon in the first few bins, but from then on it is all stuff that has been picked on the same day – and goes straight from there to the farm or, in my case, straight to the composting organisms.  If you buy vegetables from the supermarket they have gone from the field to the packing shed, to the market or to the supermarket chain distribution centre, generally on the same day, and from there to the supermarket – you will be getting it two or three days after it was picked if you are lucky.

I have a friend who works in a packing shed who takes pride in the work she does to select, trim and pack the vegetables she works on.  When she sees the same vegetables in the local branch of the supermarket her shed supplies her feelings are frequently somewhere between outrage and insult because of the difference in quality she sees compared to when it left her hands.

Anyway, back to the green waste.  Lettuce and cauliflower trimmings today, with a bit of broccoli.  Two bins are tipped into my trailer by the forklift operator, and I quickly move aside to park and cover my load so others can be served.

Back home, reverse the trailer up to the compost production bins (not easy to do in the tight space between stockpiles of horse manure, poultry manure, chipped tree loppings, chip mulch from our firebreak clearing, and sand/silt from the drains on our two kilometres of access track, as well as the last batch of compost.  Set up the water pump and hoses and get out the tools.

DSCF4682_compost veg on woodchip_small

Starting the process

The first layer is already in the compost bin: about 20cm of chip mulch from a tree I had to cut out of the firebreak, covered by a layer of the coarse compost materials from the last batch.  It’s been lying there under a layer of straw for a week or two, and with the rain we’ve had the composting process in the chip mulch is probably well started.  A thick layer of green waste goes on top of that, then a layer of chipped tree loppings that has been stockpiled since last July and is just starting to get fungal strands through the lower parts of the heap.

P1060044_Energex chipmulch_120713

The mountain of chipped tree loppings from under the power lines. We shared it with one of our neighbours and still got eight trailer loads – a full day’s work to move it all.

I wet that layer thoroughly, before adding more green waste and then a layer of decomposing barley straw from a spoiled bale that I’d put behind the compost bin a while back.  That’s wetted down too.  More greenwaste and then a layer of months-old broiler droppings.  In truth, the broiler droppings were always more wood shavings than manure, with a good dash of spilled feed and water, but now they look decidedly woody.

DSCF4687_compost-trailer-chip heap_small

The growing compost heap, and the chipped tree loppings stockpile in the background

I’m kind of wary of broiler droppings because of the short time the birds are on it, leading to a poor ratio of wood to manure, and not much breaking down of the woody material before I get it.  This weathered stuff looks like 80% wood shavings, but I notice that a lot of the woody material is quite soft, and is in a matrix of very fine dark, damp material that might already be compost.  Nevertheless, if I was really intent on making 18-day compost I wouldn’t use broiler droppings, weathered or not.  But I’m not a great fan of the strict 18-day process.  In my experience after 18 days the result can look like compost, but it never smells like it – you know that rich, earthy, good-compost smell?  Doesn’t happen for me in 18 days, even when temperatures and moisture content are all perfectly aligned.  I wonder how often it happens for others.

What I have seen is that the longer an 18-day compost is left to “mature” the better it gets, with more life in it, and generally after three weeks or so of maturing it suddenly gets that earthy smell like forest litter.  From then on it just gets better still, and eventually (if I leave it long enough) has a network of fungal hyphae extending through it.  Not that I always leave it to the fungal stage, and at times I start harvesting the finest sieved component before it smells right, if I’m desperate to make some potting mix or a seedling bed.

DSCF4688_compost-trailer-old heap_small

The last, partly used, batch of compost on the right – covered against the rain over the last few days

Back to today’s compost.  From there on it’s just a repetition of the same layers and watering, until the green waste load is used up and the compost bin is full.  Then it’s topped off with a thick layer of fluffed up barley straw (to keep it the sun off it while allowing air circulation) and I get out an old tarp to leave beside the bin in case I see heavy rain coming.

Just to make me feel good I measure the dimensions of the heap and take a final photo.  Volume of the heap: 2.28 cubic metres.  That will drop quickly in the next couple of weeks as the heap settles and water is driven out of the lettuce and cauliflower waste, but it should produce at least 1.5 cubic metres of good compost.

DSCF4692_compost-final heap_small

The finished compost heap

Finally I make a note of the date and give the heap a code on the whiteboard in the workshop, where I will record the temperature of the heap from time to time.  What I want to see is that it gets into the 50-65 degC range for at least a few days, and that it doesn’t go into the 75+ degC region for more than a short period, otherwise I’ll have to turn the heap at that stage to drop the temperature.  Then, once it has done about a week in the 50-65 range I’ll turn it when it’s convenient.  After that, once it drops to around 40 degC (not lower) I’ll turn in every few days to a week, making adjustments to water content and the time between turnings to try to keep it above 40 for two or three weeks.  After that I’ll make sure the last turning has moved it to a place where it won’t be in the way of the next batch or other work, and just keep an eye on it’s progress and of course, the smell.

By the way, do you see the fork in the last photo?  That’s a manure fork, with four tines rather than the three in a pitch (hay) fork.  The tines in the manure fork are closer together, and they are fatter as well as having a bend (or a significant curve) so it’s easier to push them under things on the ground.  Pitchforks are all very well for throwing sheaves of hay onto haystacks, but I find that they don’t pick up the shorter, looser material like compost ingredients or manure very well.  And they’ve (finally) started to become available in Southeast Queensland – at Mitre10 and Trade Tools if you’re looking for one.

* More thoughts on waste in the vegetable production system:

It’s difficult to get a good idea of the level of real wastage in the fruit and vegetable production system.  A Bush Telegraph episode on ABC Radio National on 14 July gave a figure of “$10 billion worth of food” wasted annually by “Australians”, but this isn’t broken down beyond “food”.  Later in the same article they quote figures of “between 20 and 40 per cent of fruit and vegetables grown” being rejected before they reach the shops “because they don’t meet supermarkets’ high cosmetic standards and specifications”.  However I suspect that there are different rates for fruit and vegetables going to landfill.  For example, any fruit with large seeds (avocados) would be unsuitable for stock food, for instance, as are whole potatoes, because of the risk of choking.  Apart from what is diverted to stock food at the farm or packing shed, some of the “unsuitable” fruit and veg goes to charities for distribution to low income families.

What I’m not sure about is whether fruit and vegetables grown under contract to the big supermarkets is prohibited from being sold as a condition of contract.  I’ve heard this said, but haven’t been able to find any evidence one way or the other.  It would be interesting to know.

It would also be very interesting to see a detailed breakdown of the different destinations for rejected fruit and veges.