Wicking pot maintenance and a recycling experiment

Over the last few weeks I’ve been gradually doing some “maintenance” on the wicking pots.  They have been a bit neglected since we started getting good rainfall at the end of last summer.  I had a lot of work to do to construct raised beds in the shade tunnels, and over winter these were generally more productive than the wicking pots as well as representing a much larger surface area for food production.

However the low rainfall over winter, and the lack of any signficiant rain for nearly three months has meant that we have to start managing our water supply (all rainwater in tanks) even more carefully than usual.  I’ve almost stopped watering the raised beds, and at least half of them are under a thick layer of barley straw, with nothing growing in them. It’s at times like this that the wicking pots come into their own.

The ongoing maintenance of the wicking pots amounts to regular fertilizing with alternating applications of worm tea (diluted to 50%), cow manure tea (10%), and (especially for leafy crops) diluted urine (10%).  They also get occasional surface applications of the sludge from the cow manure tea production, and of course regular topping up of their mulch to control evaporation.

Over time I find that the soil in the pots becomes somewhat “compacted”, and some crops establish such a dense root mass that it is nearly impossible to dig into the soil.  These issues are evident from a gradual decrease in their productivity and in the “health” of the plants.

Thai Basil_Wicking Pot_P1020245_20141119_small

Thai Basil and Spring Onions. The basil has already gone to seed after a long period of lush growth. After harvesting the seeds I pruned it to stimulate some new growth, so as to get more production before I am ready to replenish the soil.

Spring Onions_Wicking Pot_P1020244_20141119_small

I’m not sure how long these Spring Onions, Clumping Leeks and Clumping Shallots have been in this pot – it’s certainly more than 18 months. They’ve been harvested regularly by cutting the stems off at soil level. Now they’re starting to look a bit tired, so I’ll replenish their soil in the coming weeks.

For these reasons I like to take out the soil every 12-18 months and combine it with a mix of sandy loam from the drains on our access track, chipped horse manure, and fresh compost.

Wicking Pot_mint&kangkung_P1020239_20141119_small

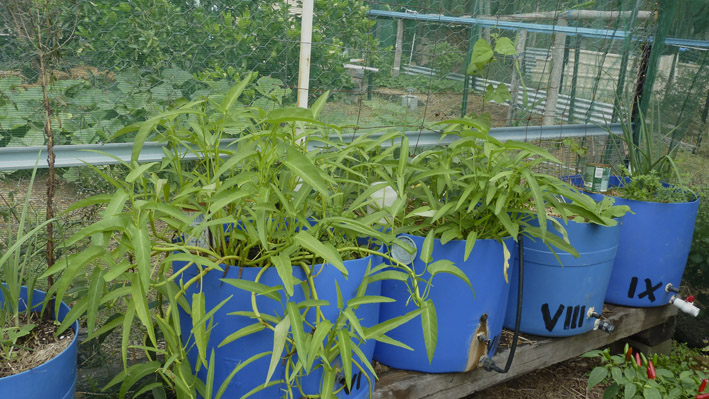
This pot was rejuvenated in early September (about 12 weeks ago) and planted with Kang Kung (Ipomoea aquatica) and Mint (on the left, partly obscured by the asparagus). Both have grown rather extravagantly, the Kang Kung more so than the mint because it responds to harvesting by becoming even more productive. The Mint was a bit of a mistake because I just noticed that it is popping up throughout the whole top of the pot – that’s what mint does, I just forgot about it. I removed the mint after taking the photo.

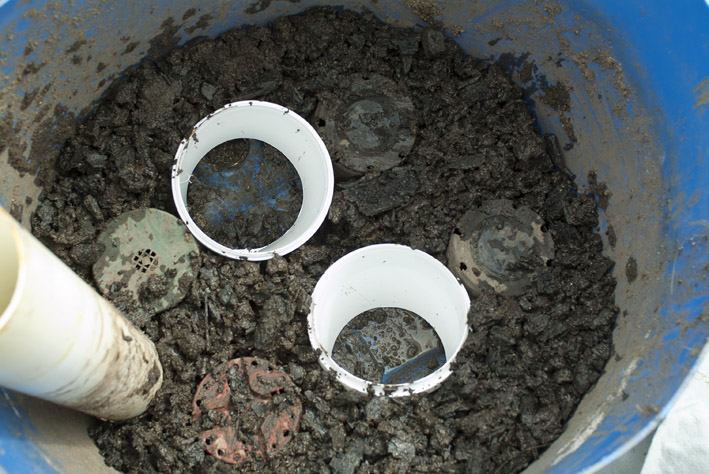
The experiment mentioned in the heading of this post refers to an attempt to find a way of using discarded “florist pots”.  These come in various sizes and are like an overly tall plant pot without any drainage holes.  Florists keep their cut flower stock in them.  They are too tall to use as plant pots because the top of the soil gets dry while the bottom is still saturated.  So I thought I’d do a quick experiment to see how they go as wicking pots.  I just drilled four drainage holes around the sides about 250mm from the top, stuck a 500mm bit of offcut plastic water pipe down the side, filled up to this line with charcoal (leaving a depression so that the soil layer extends below the drainage holes) covered it with geotextile and added potting mix.

All I had available to plant in them was some Lemon Grass that I had to move out of a raised bed, so I put single stems of that into three of these wicking pots and also into three normal plant pots.  Four weeks later two of the wicking pots have thriving clumps of Lemon Grass (the third has been a bit slow to get going) whereas in the normal plant pots it is struggling to survive.  All have been given applications of diluted urine.

Lemongrass_Wicking Pot_P1020261_small

Lemon Grass thriving in a simple wicking pot. One of the four drain holes is visible. I won’t leave it in this pot because it isn’t wide enough to let the Lemon Grass grow into a large and productive clump, but it shows that the principle works.

The “funnel” makes it easier to fill the intake and also helps to reduce evaporation.  It’s a recycled thread spool from Reverse Garbage in Brisbane.

You can see my original long post on making wicking pots here and a modification of that design here.

Do you have any novel ways to share for making or using wicking pots?  What kinds of veg do you find grow well in them?


Spring maintenance in the vege garden

Lots of action in the vege patch over the last few days.

DSCF4700_7 Sept 2014_Skitch

Part of the trellis-side bed in the Second Hugelkultur Shadehouse

Today was pretty typical.  Realised first thing this morning that I finally had to do something about the way the Mugwort was starting to smother the Sugar Snap Peas on the trellis in the 2nd Hugelkulture Shadehouse.  Four cuttings of Mugwort were planted behind the trellis on the southern side of this shadehouse as a temporary home, until I had a place where they could be planted out.  But so far I haven’t got any of the future food forest area fenced off, so there’s still not a permanent place to put the Mugwort.  And now it has gone mad with the increase in temperature as Spring comes on strong here is Southeast Queensland.

I now see that I can make use of the Mugwort behind the trellis, because I’ve seen how it can be pruned to provide a windbreak and groundcover, and the ongoing prunings will provide masses of green mulch.  That is, providing it doesn’t prove to be alleopathic.  I have my suspicions about it – the Cassava and Lemongrass it was planted near haven’t been looking very healthy, though that might be just because neither of them likes Winter very much.  This is the first year I’ve grown Cassava, and it went from rampantly healthy in late Summer to near-dead by the end of Winter, but perhaps, like Comfrey, it just doesn’t do well in Winter.

You can’t see the Mugwort growing behind the trellis because I’ve pruned it back fairly heavily, but you can see the thick layer of Mugwort prunings in the bottom left of the above photo.  This extends behind the trellis up past the Lemongrass, and this is from an original planting early last Summer of only about six or seven stems of Mugwort.  Lovely thick, soft branches and leaves that will probably break down quickly.  Nowhere near the right conditions for “chop & drop” – the evaporation way exceeds rainfall lately, so I gave it a good wetting, then covered it with a thick layer of barley straw to make sure it breaks down before it loses too much Nitrogen.

The Ceylon Spinach in the background is climbing up the Pigeon Pea.  I showed a Bangladeshi friend around the garden a few days ago and his eyes lit up when he saw the Ceylon Spinach, Amaranth, Curry Leaf trees (in pots), and Luffas – all things he knows from Bangladesh.  So I’ve potted up some Ceylon Spinach to give him, along with one of the Curry Leaf trees (which are also waiting for the food forest to be fenced so I can plant them out).

The Tatsois in this bed, like all the Brassicas in the garden, are flowering furiously.

Tatsoi.  You can see the flower stems just starting to develop.

Tatsoi. You can see the flower stems just starting to develop in the top right corner of the phots.

I’m letting some of each of the Tatsoi, Bok Choy, Pak Choy, Gai Laan and Choy Sum go to seed so I’ll have supplies for next year. Same with the Loose-leaf Lettuce.

The other thing on the agenda for today was to renovate one of the Kangkung wicking pots.

01042013P1050516_Kangkung_Wicking Pot_small

Wicking pots – they’re numbered so I can note treatments applied to different pots.

This is what they looked like in April last year (2013).  The two on the left are growing Kangkung (Water Morning Glory – Ipomoea aquatica), which is an Asian vegetable that generally grows beside drainage ditches or ponds.  It has hollow stems that can float on water, from where they put down long roots to the muddy bottom – but they grow well in wicking pots too, providing the nutrient is kept up to them.  These ones produced well until late Summer, when the heat got to them (probably combined with my failure to add sufficient compost to the top of the soil in the pot – it was just too crammed with stems to be able to get to the surface of the soil).  With Spring coming on I need to totally renovate them now if they are going to be productive into Summer.  This means emptying them out and refilling with new soil.

You can see this longer post for detail on the construction of these wicking pots.

DSCF4693_Sept 7 2014_Wicking Pot

Internal arrangement. Two 2 litre yoghurt buckets with the bottoms cut out to allow soil into the water layer, and four empty flower pots, upside down, to create voids for water storage. The black material is charcoal from the previous set-up.

I decided to modify the design slightly by allowing the soil to penetrate down into the water reservoir, to promote wicking when the reservoir level is low.  This idea came from two sources: first, Roman and Jana Spur’s wicking broccoli box design (which I mentioned here), and an article on Gardening Australia last month about some blue-barrel wicking planters for the Town Camps in Alice Springs.  The soil will fill the yoghurt buckets after the geotextile is put over the charcoal.

DSCF4695_Sept 7 2014_Wicking Pot

The geotextile has been laid over the charcoal layer at the same height as the overflow drain hole, then coarse sand has been poured into the yoghurt buckets.

I used coarse sand to fill the buckets instead of the soil mix I will use for the top layer because I have a thing about trying to avoid large amounts of nutrients getting into the water reservoir ever since my experience with sulphides forming in the bottom of my first wicking pots.

The remainder of the pot was filled with my usual raised bed soil mix, since it holds water extremely well but also drains easily when saturated.

DSCF4713_070914_Sept 7 2014_wicking pot_small

The rejuvenated wicking put, with the “survivors” of its previous incarnation given a new chance. The “jam tin” is covering the water filling pipe to keep mosquitoes out.  You can see what this wicking pot looked like 12 weeks later here.

In a couple of months this should be a good crop of Kangkung, and one of the great things about Kangkung, apart from that it’s easy to grow and tasty, is that the more you harvest it, the more it grows.


Courses at Northey Street City Farm

I’ve just received the list of courses at Northey Street City Farm in Brisbane for the rest of the year.

Two bits of good news:

First, they are offering some of their Permaculture Design Course elements as one-day courses.  Apparently people who aren’t enrolled in the full PDC can sign up for individual courses.  I haven’t seen this before, so maybe it is a new initiative by Northey Street, but anyway it is very welcome.

You can see the details of the PDC elements here, and you can sign up for individual one-day parts of it here.  The courses available as one-day workshops are:

  • Trees in Permaculture (5th September)
  • Understanding & improving your Soil (12th September)
  • Water in Permaculture (26th September)

All are full-day courses, 9.00am to 4.30pm, and cost $85 or $65 for a health care card holder.  Better get in soon if you want to attend, they are likely to be very popular.

The second bit of good news is that Tim Heard is going to do a one-day Native Bee Keeping course at Northey Street on 13th December.  Price is the same as the PDC workshops.

I attended Tim’s one-day course when he ran it in Ipswich earlier in the year.  Here’s what I said in an email to a friend:

“The workshop was fantastic.  The best workshop I can remember.  Tim Heard is not only very much a theoretical and practical expert on native bees, he’s a gifted teacher.  So much information for me to think about and digest, but I know I learned a huge amount.

“Apart from a lot of information on the types and evolution of stingless bees, design and management of hives, he split two hives in front of us, taking time to make sure everyone saw what he was doing and understood why he was doing it, and also used the hives to illustrate all the things to be aware of.  He also harvested honey from one hive (with a double honey top) while we watched”

You can book for this course here.  You won’t regret it.

Wicking pots and beds

Wicking pot with garlic, basil and clumping leek

We first started to investigate wicking pots during a seven-year drought we experienced between 2001 and 2008. At that time we were dependent on one 3,000 gallon tank for all our water needs, including the garden, though we were recycling treated greywater to the fruit trees for part of that time.

The theory behind wicking beds is simple.  Water will generally wick up most soils to a height of around 300mm.   So if water is supplied to the plants via a reservoir under the soil layer, then it will wick up the soil, and if the soil surface is more than 300mm above the water then the surface will not be wet, and there will be little or no evaporation.  Thus the only water that should be lost is what passes through the plants by transpiration.

Because this was a bit of an experiment we decided to try it first with pots, before moving on to a wicking bed, though we did make the base for the wicking bed at the same time we made the first wicking pots.

My first impressions when I thought about the design of wicking pots / beds was that it seemed like the perfect situation for creating anaerobic processes (i.e. without oxygen) that could result in some pretty horrible smells, not to mention bad impacts on the plants.

Using half a 200 Litre barrel

The first design had a drain approximately 100mm above the bottom, so that excess water (e.g. rain, or forgetting to turn the hose off when filling the reservoir) didn’t flood the roots of the plants for too long.  Just in case this drain got blocked or could not cope with the heavy storm rains we get from time to time, another drain was added above this.

Reservoir recharge pipe

The recharge pipe is made from some off-cuts of 90mm downpipe and a spare elbow, with holes cut in the bottom to allow an even distribution of water.

The bottom section was then wrapped in weed mat to keep soil and roots from getting into the pipe.

Wicking pot with recharge pipe and upturned plant pots to provide voids to make more space for water storage

Test of wicking with soil mix

Before the pot was filled with the intended medium a test of its wicking capacity was done using some cut-off soft drink bottles – the wicking height was pretty close to 300mm.

For the first trial I filled four pots with a sandy loam with a good amount of compost and some coconut coir fibres to increase the water retention capacity.  Early results were very encouraging.  Plants thrived, and on hot days when the same plants in adjacent non-wicking pots were wilting, those in the wicking pots were showing no signs of stress.  But then, after about four weeks, things started to go wrong.  Leaves of tomatoes and basil started to lose their rigidity, going a dark green colour and “collapsing”.  Those species that didn’t show these symptoms just failed to thrive.

I removed the plants from one pot and dug out the soil.  Before I got to the saturated layer there was a very strong smell of rotten eggs. Hydrogen sulphide – the tell-tale sign of anaerobic processes.  When I did get down to the saturated layer I was surprised to find some areas of shiny black soil – pretty clearly some kind of metallic sulphide deposit, and a sign of extreme anaerobic processes.  Much worse than my early misgivings had led me to expect.

What to do?  Clearly there were likely to be two aspects to the problem – a primary cause:  no, or too little, oxygen was getting to the saturated layer; and a secondary cause: too much nutrient in that layer, leading to rapid consumption of any oxygen that did reach the saturated layer.

I’d been reading about water treatment processes and about biochar at the time, and both of these mentioned the way in which the capillaries in charcoal provide habitat for an amazing range of organisms that consumed excess nutrients as well as promoting healthy soil.  Maybe charcoal would make a good medium for the saturated layer, and could possibly be combined with a routine of regularly changing the water in this layer so as to drain away any developing anaerobic products.

But what about stopping nutrients from moving into the saturated layer?  Adding plant food at the top of the soil layer wouldn’t meant that it would find it way to the saturated layer, or at least not in large quantities.  And if water could be prevented from moving downwards then there would be less likelihood of downward nutrient movement.

Possible solution:  Keep the reservoir full, only provide plant nutrient at the top of the soil layer and water it in only after the reservoir had been filled.  Draining the reservoir every few weeks (add another drain with a tap at the bottom of the wicking pot) should help prevent an anaerobic situation from getting out of control.

But why don’t most other people seem to experience this problem.  I suspect that it is because the surface to soil volume ratio in the plastic barrels I am using is much less than one finds in, for example, a raised garden bed, a bath tub (often used for wicking pots), or a wicking bed.  That higher surface area to soil volume ratio allows more oxygen to penetrate to the saturated layer.

Some people do report bad smells – have a look here, and at the response by Scarecrow (who knows a thing or two about gardening generally, including wicking beds).  She says: “When I built the in-ground beds I filled the base (‘pool’) area with sand or a sand and gravel mixture. There is little organic matter in these mixtures so there is little to ‘break down’ to cause odours.”  So my theory about anaerobic decomposition of nutrient in the saturated layer is probably right.

By and large this has been successful, as can be seen by the photo above of the garlic, basil and clumping leek.

Tomato, rocket and another lettuce variety

Pak Choy, Zuccini (courgette) and Spring Onion

Does anyone know what the plant in the foreground is in this photo?  It was given to me as gai laan (Chinese broccoli) but so many people have told me that it isn’t gai laan I’m now convinced.  Some Indonesian friends (who showed me real gai laan to convince me this isn’t it) call it “chi asem”.  I can’t find an English name for Chi asem, but I suspect it is non-hearting Chinese cabbage (wombok) [I later discovered that it is Pak Choy].  It loves wicking pots, as do spring onions.

Zuccini grows really well too, and flowers and sets fruit, but then the small fruit goes rotten and drops off. Too much water?  Wrong pH?

In general it seems that plant roots move downward in wicking pots till they reach their optimum level of saturation and oxygen.  As you might expect, water plants do particularly well.  I’ve currently got water celery (Oenanthe javanica) in a wicking pot and it is thriving.  This plant can grow in water or in damp soil, though in water it has a less bitter taste and its “celeryness” is clear. [We stopped growing Water Celery when the extent of its “weediness” became clear].   Kangkung (Water morning glory – Ipomoea aquatica) also does well.  In Southeast Asia it grows in damp soil or in water with its stems floating on the surface.

Here are a couple of links to more information on wicking pots and wicking beds: