We decided from the outset that we were going to have a composting toilet. There were a number of reasons for this, principal among which were that we didn’t want to waste an extremely valuable resource (humanure), and that we don’t have sufficient water to operate a flushing toilet.
The first model that we built, and which we used for more than ten years, was based on one of the 200L barrels used for shipping olives. These barrels are usually available from places that recycle poly barrels. The only reason that we stopped using this model was that it gets to be a bit of a chore to move a 200L barrel full of poop when the time comes to change it over. It was taking me about half a day to undo the connections, replace the full barrel with an empty one, and re-connect it – and I always seemed to put off the change-over until it became urgent (i.e. a very full barrel) and that always seemed to coincide with another urgent priority. Of course you could always install two 200L barrels side by side (both plumbed to drains and the air vent) and simply move the seat from one to the other, instead of changing over the barrels. I’ll describe the new system which uses a 60L barrel in another post.
The basic principles of the design we adopted are: a) air is drawn down through “the mass” in order to keep up a supply of oxygen to the composting process and to remove smells through the bottom of the barrel and up to a high vent; b) a sufficient mass builds up to start and maintain an efficient composting process; and c) worms can be introduced to the mass while the toilet is in operation to promote the production of a rich compost loam.

The final product – a rich loamy compost with lots of happy worms (the bits of straw don’t indicate that it is not fully composted – the straw was a top layer to help keep the mass from drying out)
In order to reduce the amount of text required, I’ll use photos to illustrate the construction of the unit. Here’s a view of most of the components associated with the barrel.

Internal fittings and outside connections
In the background is the barrel with, on the left, a connection for extracting air from under the mass, and on the right, a drain for liquids. The connections are made up from standard plumbing fittings. In the left foreground is the base which supports the mass, made up of a circular section of 25mm galvanised mesh resting on some sections of plastic pipe – in the centre is some 225mm stormwater pipe (got it cheap as an offcut at the local irrigation supplies place), and some offcuts of 90mm stormwater downpipe (these dimensions aren’t critical, your pipes can be larger or smaller). These are bolted together with galvanised 6mm bolts that have lasted for ten years, though they are now unrecognizable under a layer of rust. You can also use reinforcing mesh supports instead of the pipe sections as in this post on the Milkwood Permaculture site (though this gives a smaller space under the mass). This unit goes into the bottom of the barrel (after the drainage fittings are connected).
In the right foreground is the unit for drawing air down through the mass. The vertical components are 50mm pipes with many holes drilled in them to facilitate air exchange with the mass (you could use polypipe for this – it’s more flexible and cheaper). These are bolted onto a short length of 225mm stormwater pipe. Note that the vertical pipes extend down past the 225mm pipe – the distance they extend downward is the same as the height of the stormwater downpipe lengths under the galvanised mesh on the left. These “legs” go through holes cut in the mesh (visible in the photo), so that the 225mm pipe section sits on top of the mesh.
The photo below shows the two units sitting in the barrel. Short lengths of polypipe have been inserted into the tops of the vertical pipes to extend the aeration height. The top ends of these extensions will be pulled to the sides of the barrel just under the top lip and fastened with wire loops through holes in the barrel. If they aren’t pulled to the sides they tend to snag toilet paper as it is dropped into the barrel.

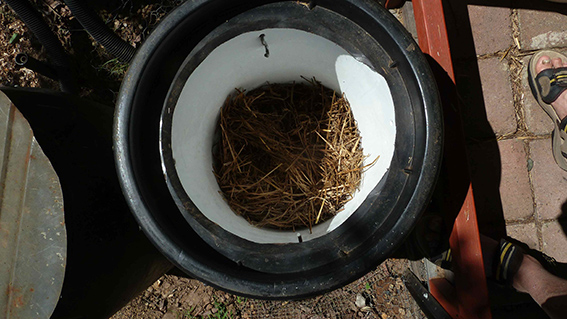
All components in barrel
When the barrel is in place and ready to be used a layer of newspaper is placed over the mesh and then a thick layer of straw (we use barley straw) is put on top of that.
The photo below shows the detail of the air outlet.

Air outlet detail
There are four parts to this connection. A male/male connection is screwed into a hole cut in the side of the barrel with an appropriately sized hole saw (keep it close to the bottom, but not so low that it will be lower than the liquid drain) so that the thread protrudes inside the barrel. A connector (i.e. with internal thread) is screwed onto this inside the barrel so as to clamp the fitting onto the wall of the barrel. Before tightening this I’ve put some bathroom silicone into the space around the connector on the inside and outside of the barrel to make a good seal. Reaching to the bottom of the barrel will almost certainly require getting your head and at least one shoulder into the barrel – not easy to do. I once rolled some distance down the hill with my head and part of my upper body inside the barrel! The fitting on the outside end of this connection has various names. My local plumbing supply calls them “dress flanges”. Anything will do that will fit into the flexible pipe shown in the photo below.
I won’t show the details of the liquid drain. It’s the same principle as the air outlet, but with appropriately sized fittings, and as close to the bottom of the barrel as you can place it. Just make sure that the connection between the pipe coming out of the barrel and the drain to take the liquid away is easy to connect and disconnect. After a lot of frustration I settled on camlock fittings (you’ll have to ask your local hardware or plumbing supply place what these are as I don’t currently have a photo of one – there are some details on these fittings here).
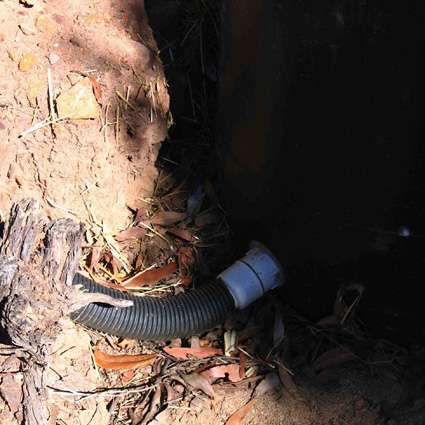
Air outlet with flex pipe
The flex pipe can be difficult to source in our area. Most places sell this pipe with many slots in it for use as a greywater distribution pipe but we need it without any holes. In the end I got mine from an agricultural machinery parts supply place that sells it as a spare part for seeding machinery.
This pipe is connected to a vertical vent pipe (another length of 90mm stormwater downpipe).

Bottom of vent pipe
The fittings here should be pretty obvious. The reason for the Y-junction at the bottom of the vent pipe is to allow condensation or rainwater to be drained out (in practice it seems to collect here and then evaporate without needing any intervention).
At the top of the vent pipe you’ll need a sewer vent whirlybird. They’re available from plumbing supply places. You can get one to fit onto 90mm or 100mm stormwater pipe, but I added a short length of wider pipe at the top and got a whirlybird that would fit onto that. The top of the vent pipe (or all of it) can be painted black so that the sun heats the air in the pipe and starts it moving upward, assisting the whirlybird to draw air down through the mass in the toilet. The wider pipe at the top just provides a larger volume of air to be heated – I’m not sure whether it makes any difference or not.

Whirlybird on top of a section of wider pipe
That’s about it, apart from putting a seat on top of the barrel. I used the screw-down flange that holds the top of the barrel in place (photo below) and just trimmed a bit of the edge of it at the front to allow well endowed males to use the toilet without incurring any risk. Ignore the white insert in the barrel, this is part of a trial of new approach that doesn’t allow for composting in the barrel but removes the need to wrestle with a full 200L barrel when full. I’ll describe it in another post.
Top on barrel
The seat base in the photo below is made from two layers of marine ply. The top layer is large enough to sit over the top of the barrel and to carry a standard toilet seat. The lower layer (not visible here) has the same size hole as the upper layer and is glued and screwed to this. It is just large enough to fit into the screw-on top of the barrel without too much free play. In this way the seat stays in place without moving around when you sit on it, but can be easily lifted off the top of the barrel. This doesn’t have to be marine ply, but since it was going to be out in the weather for years I thought it was worth the extra cost. You can see the toilet seat to the left of the photo and in the lower photo – it came from a recycled timber yard.

Seat base
 Here’s a shot of the two barrels in place. The “resting” barrel on the left finishes composting while the barrel on the right fills (you can’t really see it because it’s covered with shade cloth – the photo was taken in summer and the shade cloth is needed then to keep the barrel from getting too hot for the worms).

Two barrels in place
Once the barrel is about one-third full we add some compost worms from one of our worm farms to it and cover them with a layer of damp soil. At first we doubted that they would tolerate this environment, but they take to it readily and by the time the barrel is full it has a good population of worms and a lot of the mass has already been broken down by them.
With just the two of us using it the barrel takes six to nine months to fill. In fact in the later stages the mass is reducing in volume, as a result of the composting process and the actions of the worms, just about as fast as we are adding volume to it.
There aren’t any special precautions to take with this type of toilet, apart from making sure the mass is damp enough to keep the composting going – we keep a spray bottle near the toilet, but seldom need to use it. People who are taking antibiotics should refrain from using the toilet in case the antibiotic residues affect the composting process, and no non-compostable material (e.g. cigarette butts, tampons) should be put into the barrel.
When the full barrel is first moved to the resting position we put a layer of kitchen scraps on top and cover it with damp newspapers. This encourages the compost worms that are already in the barrel to come to the top and start work on the top layer. If the worm population isn’t obvious in the top layer within a couple of weeks we add more compost worms.
The resting barrel has a liquid drain and a flexible hose connected to it, but the latter is mostly to keep critters from getting into the bottom section of the barrel. I always intended to connect this to the vent pipe but never got around to it, and in the end it didn’t seem to matter. In fact increasing the air flow might have dried out the mass too much. Keeping the top of the mass damp is one of the few management measures that the resting bin requires. We generally cover it with a thick layer of wet newspapers or hessian, and try to remember to add water to this occasionally.
You can wait for all of the mass to be composted and then empty the barrel just before changing it over with a new full barrel, but we have found that the worms population will be larger and work more effectively if we regularly take off the top layer of composted worm castings.
I’m happy to answer any questions about this system or to give advice on construction.
