Went to the talk by Nicole Foss (the person behind The AutomaticEarth website) in Laidley on Saturday afternoon on the threats to Australia from the combination of excessive personal debt, over-leveraged banks, the approaching global limits to growth (including peak oil) and climate change.
This wasn’t some gloom-and-doom hand-wringing session. Foss takes a solution-oriented approach and explored a range of choices available to people at the individual, family and community levels. She covered the alternatives, ranging across urban, rural, suburban retrofit, intentional community, eco-village – and summarised the advantages and disadvantages of each option.
Along the way she offered Australia an outline of a “Plan-B”: stop basing the economy on feeding the Chinese demand for resources; stop trying to feed 60 million people (and destroying Australia’s soils in the process) instead focussing on food security for Australia into the long term; and replace the sense of complacency with a sense of urgency.
Nicole Foss, who sometimes writes under the name of ‘Stoneleigh’, is a Canadian sustainability, energy, and finance expert. She is best known for her works on her website, The Automatic Earth. She was editor of the Oil Drum Canada website where she wrote on the connections between energy and finance. She now lives in New Zealand.
The event was organised by SavourSoil Permaculture (a Laidley-based small business), and in my opinion made an important contribution to local understanding of the most significant issues facing us and the Earth and, most important, provided a window into the approaches we will need to adopt to ensure personal and community resilience. Thanks Michael, good to see people wiling to make such a contribution to the community.
Rafaele Joudry from Atamai Eco-Village in the north of New Zealand’s South Island (where Foss now lives) gave an overview of Atamai and its philosophy.
I’ve just “upgraded” my compost thermometer. Previously it consisted of a digital cable-probe thermometer taped to a length of reinforcing rod. Simple, effective, and awkward to use, and risking breakage of the thermometer and the probe.
Overview of the new compost thermometer
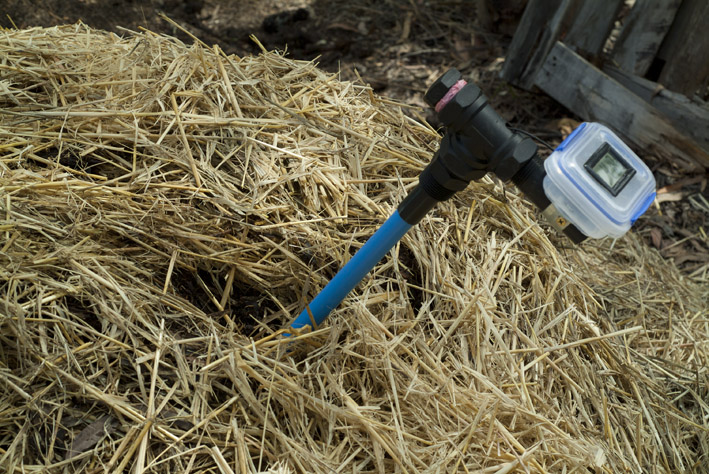
The new model is made almost completely from bits and pieces lying around in the workshop, things from Reverse Garbage in Brisbane, or cheap “off the shelf” parts from plumbing supply shops, supermarkets, or eBay. The shaft length is 880mm, plenty long enough for reaching into a 1 cu.m. or larger compost heap.
Side view of the top of the thermometer showing the main components
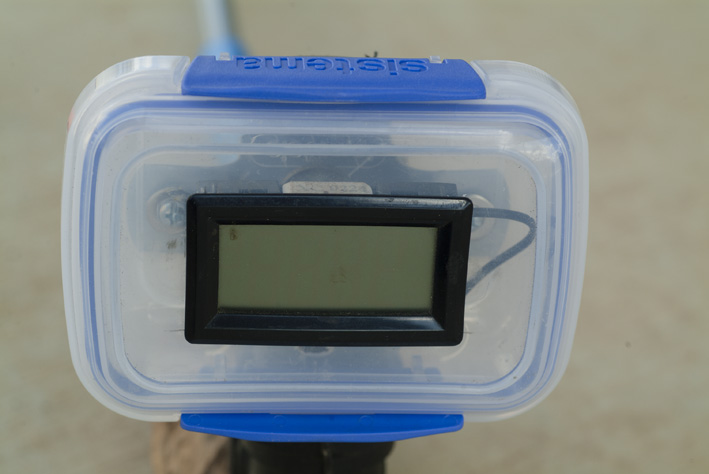
The thermometer itself is housed in a plastic kitchen container from the local supermarket – cost about $2. It’s held onto a short length of threaded 25mm PVC water pipe (cost about $3.50 for a 300mm length from Masters Hardware, and I’ve still got the remainder with a threaded end to use for another project) with a 25mm conduit saddle clamp (cost $0.65 from hardware). This screws into a threaded PVC “T” (from my plumbing spares box – cost maybe $2.50) that is closed off on the other side with a 25mm bung (also from my plumbing spares box and not really necessary). The T joins the shaft via a 25mm nipple joiner (only used in order to achieve a join with the blue part of the shaft – cost maybe $2.00). The internal diameter of the nipple didn’t quite match the blue part of the shaft, so I cut off a short section of rural polypipe (from a huge heap of off-cuts) and hit it with the heat gun to slip it over the blue shaft. No glue needed. The piece of blue PVC conduit came from Reverse Garbage in Brisbane (cost maybe $0.70 – Reverse Garbage is a fantastic place to browse. I always come away with things I didn’t even know I needed until I saw them).
Thermometer screen unit inserted into cut-out in the top of the case
The main thermometer unit with the digital screen on the front is made to be inserted into an instrument panel, so the black “flashing” around the screen is a few mm wider than the main housing, to hide the edges of the cut-out. On each end of the main housing there is a “lug” which pops past the end of the cut-out to hold the unit in place. I carefully measured the main part of the thermometer housing and marked the outline onto the top of the case, then cut it out using a drill and a hacksaw blade.
Using this waterproof kitchen box helps to keep moisture and dirt from getting onto the back of the thermometer when using it around compost piles.
I got the thermometer from Jaycar in Brisbane years ago for $14.95. They haven’t had them in stock for quite a while, but you can buy these on the internet or on eBay. Make sure the cable length is long enough, and that there is an on/off switch (if you want one). Good idea to check the range too, though the range we are interested in for compost-making is usually within the range of this type of thermometer. Oven/barbecue thermometers are generally way overpriced and not easily adapted to something like this.
Conduit saddle clamp holding the case to the short section of threaded pipe.
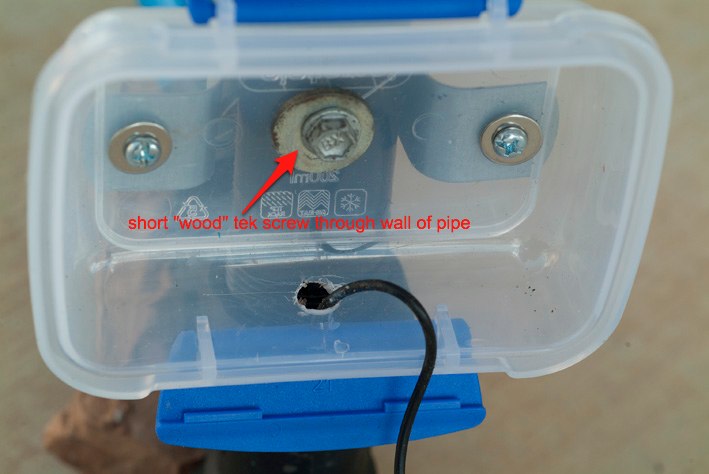
The case is held onto the threaded pipe with a 25mm saddle clamp made for clamping conduit or water pipe onto a wall. The short bolts I had in my “odd nuts & bolts” box needed large washers because of the large holes in the clamps. On the other side I used large washers inside the case to spread the force so as not to crack the case.
Mounting the case onto the pipe
Because the clamp isn’t tight around the pipe I put a Tek screw (wood thread, not metal) through a hole drilled in the base of the case and into the wall of the pipe. This needed a largeish washer under the head of the Tek screw so that the pressure of tightening the screw didn’t crack the case. The hole where the cable exits the case could be sealed with silicone, but I’d be wary of causing condensation inside the case.
The back of the thermometer when it’s mounted in the lid of the case.
It’s really easy to pop the lid off the case to press the on/off button on the thermometer. This prolongs the life of the battery, but I’ve had a couple of similar digital probe thermometers that don’t have on/off switches lying around for months, with the display constantly “on” and their batteries haven’t gone flat yet – you could always take the battery out between uses (store it in the case) if battery life is an issue. Note the possibility of leaving the probe in the compost heap and recording the maximum and minimum temperatures over a period.
It’s necessary to find a way to get the probe down the shaft of the thermometer
Depending on how you mount the thermometer case on top of the shaft there are many ways of getting the probe on its cable to the other end of the shaft. I chose to drill a hole in the “T” above the shaft and drop the probe down there. You need to make sure that if there are any joins in the shaft they do not stop the probe from passing. I could have (and probably will) put some silicone over this hole – mostly so that if anything snags the cable it doesn’t transfer the strain to the cable-probe join.
The probe housing on the end of the shaft
The end of the shaft is a metal section that looks like it was once a short, snap-on leg for a piece of equipment (from Reverse Garbage). The “snap-on” end is crimped to just the right size to fit into one of those disposable applicators that come with silicone tubes (or glue, or gap sealant, etc. etc.) for use in caulking guns. I cut off the tip of the applicator so that the opening was just wide enough for the probe to be squeezed through, then filled the space behind it with wall panel glue, putting some around the end of the shaft to hold the applicator on. In theory this should hold the probe securely in place when it is pushed into the compost heap. I forgot that the glue I used needs contact with air to harden, and putting the applicator straight onto the shaft before the glue was dry meant that it dried very slowly. I gave the probe a testing “wiggle” a few hours after I’d put the glue in, but the glue was far from dry so that there is now some movement in the probe. Dumb! That doesn’t really matter, since I’ve always used a length of conduit to make a hole in the compost heap to insert the probe, so I’ll just keep doing that. The applicator was free, and the glue was already in the workshop.
It’s not shown in any photos, but I’ve found a bit of communication cable conduit that has just the right internal diameter to slip over the shaft, and fit firmly around the rural polypipe at the top. This is longer than the shaft, so it protects the probe when the thermometer isn’t being used.
The compost thermometer in use.
First reading!
The thermometer takes longer (1-1.5 minutes) to reach a steady reading than it did previously, probably because part of the probe is inside the end of the shaft. This compost heap was reading 54 degC before I gave it its second turning yesterday (about two weeks after the heap was made). It’s already back up to 46.2 degC, and might get into the 50s though it has already had a high temperature phase in the first week. I’ll be happy if it sits in the 40+ range for a while. You can see details of the making of this heap here.
So there it is. A compost thermometer for less than $30, depending on how much you can make use of “found” and recycled items.
How does it compare to other compost thermometers?
First, it can measure compost temperature, probably at least as accurately as any other compost thermometer.
Second, with the digital thermometer I used it is possible to stick it in the heap, turn the readout on and leave it there for days or weeks, giving a constant reading of temperature as well as recording maximum and minimum temperatures (I haven’t tried this yet, but the function buttons are there on the back of the case). I haven’t seen a commercial unit which has these functions.
Third it probably isn’t as robust as commercially available compost thermometers, but if it is treated carefully it should last well. And, at this price I wouldn’t be too unhappy if I had to replace the thermometer unit or a part of the housing or shaft. If I’d bought a commercial compost thermometer and it broke I’d be very unhappy because of what they cost.
And that brings me to the fourth consideration – cost. You can get a compost thermometer in Australia from Agricultural Solutions for AUD$160. A friend of mine bought one recently and he is happy with it, and I’d assume there are others out there for around the same price.
Until at least the middle of 2013 you used to be able to buy a compost thermometer from the Permaculture Research Institute (Geoff Lawton’s organisation) for AUD$294.72 via the online shop on the Permaculture News website. However that unit no longer appears in the products listing. It was built like a truck, with an analogue dial like an old fashioned oven thermometer and surrounded by a steel “wheel” grip, but functionally it was still a thermocouple in a shaft probe with a readout – that’s all. I had some discussion via email with Craig Mackintosh (the PRI website editor) about the price/value issues with that unit, after he rejected a comment I’d submitted to a posting which promoted it and linked to their shop. I’d described the unit I was using at the time (an early prototype of this one) and it’s very low cost, and in the email exchange Craig asserted that “There is no comparison between the two probes you’re speaking about.” Well, no, at least not in terms of price.
So there are other units out there, and you can buy one of them off the shelf much easier than making a unit like the one described above, if that suits your available time and resources. But the option does exist to make a fully functional compost thermometer for a very low cash outlay and at the same time recycle some resources.
I’ve just finished reading Enough is Enough: Building a Sustainable Economy in a World of Finite Resources, so I’m pretty ‘primed’ in terms of statements urging “economic growth” as the solution to the world’s economic ills. One thing the book has made me realise is just how often we are bombarded with the mantra of economic growth, and how much it is seen by politicians, conservative economists and the media as the only way to achieve social, industrial and political goals. And if you combine references to the need for economic growth with the media’s fascination with economic indicators such as GDP and stock market indices, it’s really clear that we are on an economic growth express train.
I’d always been of the view that targeting economic growth is the lazy policy option, believing that we can have a fair, effective and comfortable society without growth – it would just take a lot more brain-power than the average policy formulator is willing to apply. However reading Rob Dietz and Dan O’Neill’s book convinced me that a steady state economy is the only way forward, though I felt that there was little chance of there being any kind of mainstream movement toward this approach before it is too late. How often do you even see or hear the term “steady state economy”?
Well, an article in today’s edition of The Conversation might indicate that we are going to hear about it a whole lot more in the near future. It’s an important opening to a conversation that the world has to have now (and should have had long ago). I hope it won’t spoil the story if I tell you the author’s conclusion: Climate stability demands nothing less than a wholesale economic shift – moving beyond growth and into a culture of consumption based on sufficiency. Or as Dietz and O’Neill say: Enough is Enough. Read the book next.
A newly released report called Better Growth, Better Climate draws the seductive conclusion that “we can create lasting economic growth while also tackling the immense risks of climate change”. But while…
Economic growth is incompatible with the rapid emissions reductions that are now necessary. AAP Image/David Crosling
A newly released report called Better Growth, Better Climate draws the seductive conclusion that “we can create lasting economic growth while also tackling the immense risks of climate change”.
But while the report, spearheaded by former Mexican president Felipe Calderón and UK climate economist Nicholas Stern, wisely points out the importance of efficiency improvements and renewable energy, it fails miserably to back up its core message.
The fact is that the world has a finite carbon budget, and we’ll blow that budget – sooner rather than later – if economic growth remains our objective.
Carbon budgets
The fundamental weakness of the new report can be shown by considering the implications of the world’s carbon budget, a notion that has entered the vocabulary of climate science in recent years. This concept refers to the maximum carbon emissions that can be released into the atmosphere if the world is to avoid dangerous climate change.
Although the science underpinning the carbon budget is increasingly robust – and has been built into the modelling of the Intergovernmental Panel on Climate Change (IPCC) – scientists, politicians, and the broader public have been slow to recognise its radical socio-economic and political implications.
The unpalatable truth is that, for developed nations, continued economic growth as conventionally measured is incompatible with climate stability. Indeed, a safe climate requires that we now need a phase of planned economic contraction, or “degrowth”.
The prospect of deliberate economic contraction will strike most people as an outrageous proposition, but the numbers below speak for themselves. My research has focused on this need to power down our energy-intensive economy if we are to avoid blowing the carbon budget.
This does not simply mean producing and consuming more efficiently and shifting to renewable energy, necessary though these changes are. It also requires that we produce and consume less – a conclusion that few dare to utter. Fortunately, the extent of wasteful overconsumption in the developed nations means that degrowth can actually be in our own interests, if we manage the transition wisely.
Degrowth and the carbon budget
To set our carbon budget, we have to answer three initial questions:
What temperature rise above pre-industrial levels should we be aiming to avoid?
What risk of exceeding this temperature limit are we prepared to accept?
How should the resulting global carbon budget be distributed between nations?
In order to unpack the economic implications of carbon budget analysis, I draw on the seminal work of climate scientists Kevin Anderson and Alice Bows, whose analyses are based on the following answers to the above questions.
1. Temperature
The world should aim to keep warming below 2C relative to pre-industrial levels. This threshold has been reaffirmed in recent international climate negotiations, including at Copenhagen and Cancun, so it represents an agreed goal.
Nevertheless, in recent years evidence has indicated that many ecosystems are more sensitive to increases in temperature than previously thought, meaning that 2C might not be a “safe” threshold after all. Many scientists, not to mention the small island states, argue that a 2C average rise in global temperature would be extremely dangerous, and that 1.5C or less would be more appropriate. Far from being a radical goal, 2C is actually a moderate one.
2. Risk
Because the future effects of further carbon emissions are complex, they can only be expressed in terms of probability. For the purposes of this analysis, we’ll aim for a carbon budget that gives us a 50% chance of avoiding 2C of warming. Given the dire consequences of exceeding the 2C threshold, the precautionary principle really demands a far higher probability of success than 50%, but let’s stick with this for now.
3. Distribution
Developing countries (known in UN climate negotiations as “Non-Annex 1 countries”) deserve a greater per-capita share of the global carbon budget, primarily because they are home to billions of people who still live in poverty and because these nations are less responsible for historic emissions.
Nevertheless, a stable climate calls for ambitious assumptions about when developing nations’ emissions should peak and begin to fall. Anderson and Bows assume that non-Annex 1 nations will peak in emissions by 2025 and then decarbonise at an unprecedented rate of 7% per year.
Such ambitious emissions cuts would also benefit developed (“Annex 1”) nations, because less of the global carbon budget would be consumed by the developing nations.
The carbon budget for the developed nations is calculated by subtracting the developing nations’ budget from the global budget. In order to keep to this budget, developed nations must reduce emissions by 8-10% each year in absolute terms (rather than per unit of economic productivity) over the coming decades. (For more detail on this calculation, see here.)
These numbers were formulated in 2011. Since then global greenhouse emissions have continued to increase, so these emissions-reduction targets should be regarded as a bare minimum.
The economics of cutting carbon
We can’t make such deep emissions cuts while still growing the economy. In his landmark 2006 review, UK economist Nicholas Stern calculated that decarbonisation of more than 3-4% is incompatible with economic growth. He noted that emissions reductions of more than 1% per year have historically been “associated with economic recession or upheaval”.
We can decarbonise our economic activity progressively by moving to renewable or low-carbon energy systems, and by producing goods and services in more energy-efficient ways. But this takes time – probably decades. Also, don’t forget that renewable energy systems themselves require energy to build.
We can’t cut emissions by 8-10% per year – as the carbon budget says we must – purely through energy efficiency and renewable power, especially if we expect to keep growing the economy while we do it. Significant emissions reductions will require us to use considerably less energy. And because energy use and economic activity are intimately related, less energy means less production and less consumption.
Beyond economic growth
It therefore follows that developed nations should immediately begin a strategy of planned economic contraction, with less energy and resource use. This “radical” conclusion follows logically from the moderate assumptions stated above, and it contradicts the widespread assurances that maintaining a safe climate is compatible with continued economic growth.
It is even harder to reconcile climate action with economic growth when you consider that the assumptions above are too moderate anyway. If we were to decide on limiting warming to 1.5C instead of 2C, with a higher chance of avoiding that threshold (say 80% or 90% instead of 50%), then that would render our carbon budget even smaller – or already used up.
Climate stability demands nothing less than a wholesale economic shift – moving beyond growth and into a culture of consumption based on sufficiency.
The conclusions drawn by the Better Growth, Better Climate report seem to suggest, however, that disciples of growth are still not ready to let go of their god. They will continue to insist blindly that we can “green” capitalism and grow ourselves out of our ecological crises.
Moving to a stable, post-growth economy is a complex, challenging and confronting prospect for many people. Success is unlikely, admittedly, but it is even more unlikely if we don’t have the courage to face the facts.
Back in late August I described the process of putting together an 18-day compost heap. That heap was made on August 26. When I measured the temperature on August 30 it was just over 50 degC. I suspected at the time that the temperature had been higher during the four days in between, because of the amount of green vegetable matter used, but I couldn’t be sure of this.
On September 5 I turned the heap for the first time, but before turning it I checked the internal temperature – 52 degC – still within the thermophilic phase of composting(1) where composting is at its most rapid and is bacterially dominated. The thermophilic phase occurs around 40-65 degC and at these temperatures pathogens and weed seeds will be killed, but “heat loving” organisms will thrive. Above 70 degC it is necessary to start thinking about reducing the temperature so as to avoid death of the beneficial composting organisms. This heat is being produced by the metabolic processes of the organisms doing the composting, so it is good to see that they have been hard at work for a week or more. The fact that it is progressing so well indicates that, during the time I wasn’t taking measurements, the temperature didn’t get into the 70+ degC, or at least not for any appreciable time.
Part way into turning the heap. It looks a long way away from the original heap, but that’s caused by the camera lens. In fact it is a comfortable reach from one to the other with the long-handled manure fork.
The first surprise was the extent to which the original heap had subsided – it was right up to the top of the frames in the background. I should have expected this, for two reasons: first, the green material was pretty coarse, so there would have been a lot of air spaces in the heap to compact down under the weight of the overlying material; and second, that green material made up a large proportion of the heap, and once it started to break down there would have been a lot of water released, thus reducing its volume. It is still well above once cubic metre, which is roughly the size required to reach and maintain hot composting.
You can see that a lot of the drier/harder materials have only started to break down, but what isn’t so obvious is that the vast majority of the original green material is difficult to identify – this is after 10 days of composting (in true 18-day compost procedure the first turn would have been after four days, but I did warn in the earlier post that this would be “more or less” 18-day compost).
What is important, but not obvious from the photo is that the heap generally had a good water content, though of course the outer layers (and in this case the bottom layer too) were on the dry side. I had a hose handy to water both the working face of the old heap and the new heap whenever I came across material that was too dry. A heap at this stage is too wet if you can squeeze water out of a handful of material, and too dry if a hard squeeze cannot produce any “cohesion” of the material (it doesn’t have to produce wet clumps, just some cohesion resulting from its wetness). If in doubt, a bit too dry is way better than too wet, because too wet leads to anaerobic processes.
The edge of the new heap as it grows. Key things to note are: (a) the mix of fine and coarse material, (b) that some of the material is loose and dry (I need to water the heap before adding more), and particularly (c) the fungus-matted material on top of the heap.
The first thing I noticed was that there is quite a bit of woody and dry leaf material. The woody stuff is expected because of the use of coarse mulched tree material from under the power lines in the area. The bigger bits of this won’t break down fully in an 18-day cycle, but they will during the later “maturing” phase of fungal-dominated composting. Among these larger components was a matrix of fine material well on the way to becoming compost; this would have derived from the green vegetable waste and the matured broiler manure.
The second thing, and this was a bit of a surprise, was that the 20cm of chip mulch base which had been in the bin for a couple of weeks before I made the heap had become fungus-matted, rather like tempeh (the Indonesian fungus-impregnated soya bean delicacy). You can see where I’ve thrown this material onto the top of the new heap in the photo above. Clearly the temperature at the bottom of the heap had not gone high enough to kill off the fungi but was within the mesophilic range (25-45 degC) where fungi are encouraged. Here’s a close-up of that material.
Fungal-matting of some of the chip mulch which had been on the bottom of the original heap.
This material provides a lovely base of fungal inoculation of the heap, so I made an effort to include it in as many layers of the new heap as possible. I did worry a bit about the possibility of “matting” of these clumps into impervious layers, rather like paper tends to do in a compost heap if you add too much in one layer and make it too wet. All the more reason to spread it through the new heap as much as possible.
That reminds me – it is very important when you are making or turning a hot compost heap to keep it “fluffy”, i.e. to incorporate as much air as possible, because without air the (aerobic) organisms you want to do your composting can’t survive. They will be replaced by anaerobic(2) organisms, and where these dominate they produce intermediate compounds including methane, organic acids, hydrogen sulphide and other substances. In the absence of oxygen, these compounds accumulate and are not metabolized further – many of them have strong odours and some are phytotoxic (poisonous to plants(3)). One of the things I like about my long-handled manure fork is that it is very easy with a flick of the wrist to turn a forkful upside down as I throw it onto the heap, thus loosening it up as it falls.
Putting the loose straw cover onto the heap to keep it from drying out while still allowing air to circulate.
So that’s it. With the heap covered with a thick layer of loose straw it can sit and do it’s thing until the next turning.
The open area in the back of the above photo is where I can turn the car when I’ve got a trailer behind. In the background are the sections cut out of an old water tank that had been through a bushfire. These now hold maturing broiler manure and horse manure.
(1) There are many good sources of information on the stages of composting and the factors affecting the process. For a quick overview of the main points you can go to the Cornell Composting web page.
(2) Misra, R.V., R.N. Roy and H. Hiraoka (2003). On-farm composting methods. Land and Water Discussion Paper 2. FAO, Rome. [This publication has details on many composting techniques, including a number of anaerobic methods. You can download the whole document here].
(3) Brinton, W., & Trankner, A. (1999). Compost maturity as expressed by phytotoxicity and volatile organic acids. In Orbit-99 Conf Proceedings, University Bauhaus Weimar. Retrieved from http://www.solvita.com/pdf-files/voa_eu2.pdf [Gives some idea of the potential for composts to become phytotoxic and the compounds involved].
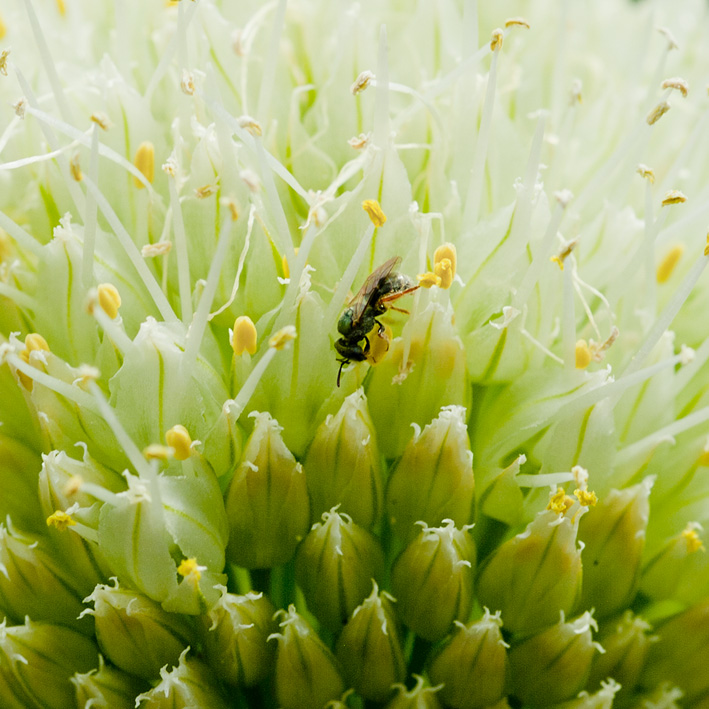
Native bee (Tetragonula carbonaria) on a Radish flower. Note the full pollen sacks on its hind legs. These radishes have taken ages to actually get to the flowering stage (with bulbs now the size of small pumpkins) but with the help of these bees we look like getting plenty of seeds.
I was out in the vege garden early yesterday morning and suddenly realised that I was seeing far more bees than I had for a long time. It was early enough that the native bees greatly outnumbered the European honeybees. Our social native bees get up much earlier than the foreigners. I think it was Tim Heard (“Mr Native Bees” in this part of the world) who first put me onto this at one of his one-day workshops. Whoever it was told the story of the researcher who was looking into the pollination of the vast Macadamia nut orchards in northern New South Wales and discovered that by the time the European honeybees had got out of their (expensively rented) hives, the Macadamia flowers had already been pollinated by local native bees.
The bees I was watching yesterday were Tetragonula* carbonaria, one of more than 2,000 species of native bees in Australia, and one of only ten social species among the Australian native bees. We also regularly get Blue-banded Bees (Amegilla cingulata) in our garden (a solitary species), and I’m sure there must be many more that I haven’t noticed yet.
There were a lot of flowers for them to choose from because I’m letting a lot of things go to seed, like Loose-leaf Lettuce, Radish, Amaranth, Ceylon Spinach (can you stop it from going to seed?), and a whole range of Asian Brassicas.
Working hard in the jungle world of a Spring Onion flower (the bee’s colours may be a little off – I was pushing the image to its limits in early morning light and using a hand-held camera)
You can find useful links to information about Australian native bees here. If you are interested in the reasons for the recent change of the name of the Trigona genus (to which our small native bees used to belong) to Tetragonula there’s an account here, with links to even more information.
Lots of action in the vege patch over the last few days.
Part of the trellis-side bed in the Second Hugelkultur Shadehouse
Today was pretty typical. Realised first thing this morning that I finally had to do something about the way the Mugwort was starting to smother the Sugar Snap Peas on the trellis in the 2nd Hugelkulture Shadehouse. Four cuttings of Mugwort were planted behind the trellis on the southern side of this shadehouse as a temporary home, until I had a place where they could be planted out. But so far I haven’t got any of the future food forest area fenced off, so there’s still not a permanent place to put the Mugwort. And now it has gone mad with the increase in temperature as Spring comes on strong here is Southeast Queensland.
I now see that I can make use of the Mugwort behind the trellis, because I’ve seen how it can be pruned to provide a windbreak and groundcover, and the ongoing prunings will provide masses of green mulch. That is, providing it doesn’t prove to be alleopathic. I have my suspicions about it – the Cassava and Lemongrass it was planted near haven’t been looking very healthy, though that might be just because neither of them likes Winter very much. This is the first year I’ve grown Cassava, and it went from rampantly healthy in late Summer to near-dead by the end of Winter, but perhaps, like Comfrey, it just doesn’t do well in Winter.
You can’t see the Mugwort growing behind the trellis because I’ve pruned it back fairly heavily, but you can see the thick layer of Mugwort prunings in the bottom left of the above photo. This extends behind the trellis up past the Lemongrass, and this is from an original planting early last Summer of only about six or seven stems of Mugwort. Lovely thick, soft branches and leaves that will probably break down quickly. Nowhere near the right conditions for “chop & drop” – the evaporation way exceeds rainfall lately, so I gave it a good wetting, then covered it with a thick layer of barley straw to make sure it breaks down before it loses too much Nitrogen.
The Ceylon Spinach in the background is climbing up the Pigeon Pea. I showed a Bangladeshi friend around the garden a few days ago and his eyes lit up when he saw the Ceylon Spinach, Amaranth, Curry Leaf trees (in pots), and Luffas – all things he knows from Bangladesh. So I’ve potted up some Ceylon Spinach to give him, along with one of the Curry Leaf trees (which are also waiting for the food forest to be fenced so I can plant them out).
The Tatsois in this bed, like all the Brassicas in the garden, are flowering furiously.
Tatsoi. You can see the flower stems just starting to develop in the top right corner of the phots.
I’m letting some of each of the Tatsoi, Bok Choy, Pak Choy, Gai Laan and Choy Sum go to seed so I’ll have supplies for next year. Same with the Loose-leaf Lettuce.
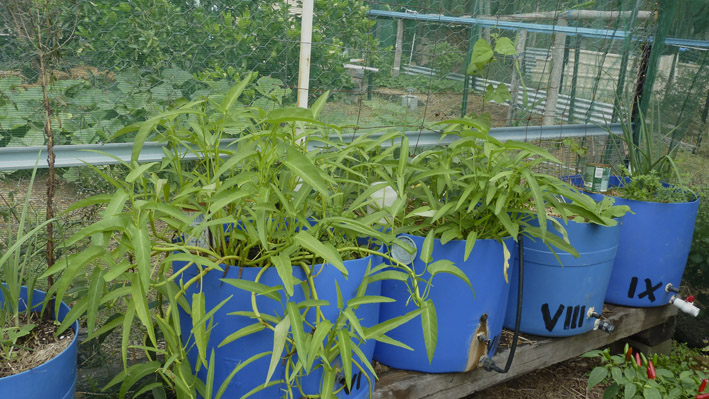
The other thing on the agenda for today was to renovate one of the Kangkung wicking pots.
Wicking pots – they’re numbered so I can note treatments applied to different pots.
This is what they looked like in April last year (2013). The two on the left are growing Kangkung (Water Morning Glory – Ipomoea aquatica), which is an Asian vegetable that generally grows beside drainage ditches or ponds. It has hollow stems that can float on water, from where they put down long roots to the muddy bottom – but they grow well in wicking pots too, providing the nutrient is kept up to them. These ones produced well until late Summer, when the heat got to them (probably combined with my failure to add sufficient compost to the top of the soil in the pot – it was just too crammed with stems to be able to get to the surface of the soil). With Spring coming on I need to totally renovate them now if they are going to be productive into Summer. This means emptying them out and refilling with new soil.
You can see this longer post for detail on the construction of these wicking pots.
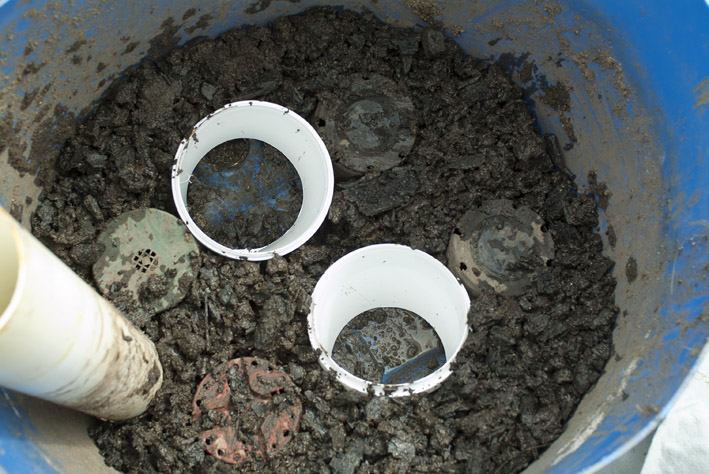
Internal arrangement. Two 2 litre yoghurt buckets with the bottoms cut out to allow soil into the water layer, and four empty flower pots, upside down, to create voids for water storage. The black material is charcoal from the previous set-up.
I decided to modify the design slightly by allowing the soil to penetrate down into the water reservoir, to promote wicking when the reservoir level is low. This idea came from two sources: first, Roman and Jana Spur’s wicking broccoli box design (which I mentioned here), and an article on Gardening Australia last month about some blue-barrel wicking planters for the Town Camps in Alice Springs. The soil will fill the yoghurt buckets after the geotextile is put over the charcoal.
The geotextile has been laid over the charcoal layer at the same height as the overflow drain hole, then coarse sand has been poured into the yoghurt buckets.
I used coarse sand to fill the buckets instead of the soil mix I will use for the top layer because I have a thing about trying to avoid large amounts of nutrients getting into the water reservoir ever since my experience with sulphides forming in the bottom of my first wicking pots.
The remainder of the pot was filled with my usual raised bed soil mix, since it holds water extremely well but also drains easily when saturated.
The rejuvenated wicking put, with the “survivors” of its previous incarnation given a new chance. The “jam tin” is covering the water filling pipe to keep mosquitoes out. You can see what this wicking pot looked like 12 weeks later here.
In a couple of months this should be a good crop of Kangkung, and one of the great things about Kangkung, apart from that it’s easy to grow and tasty, is that the more you harvest it, the more it grows.