Why climate change is not an environmental issue

This video was brought to my attention by mikestasse over at Damn the Matrix.  It makes a very important point: climate change is a national security issue, not an environmental issue.  There are no trade-offs to be made between “the environment” and economics/development in regard to climate change. This is about the future of human civilization and quite likely the habitability of the Earth for both humans and many of the species currently existing.  Climate change not only doesn’t respect borders – extreme climate change, which is where we are headed now without major and quick action, will make national borders meaningless and destroy national economies.

It is edited and narrated by Ryan Louis Cooper and inspired by an article by David Roberts.

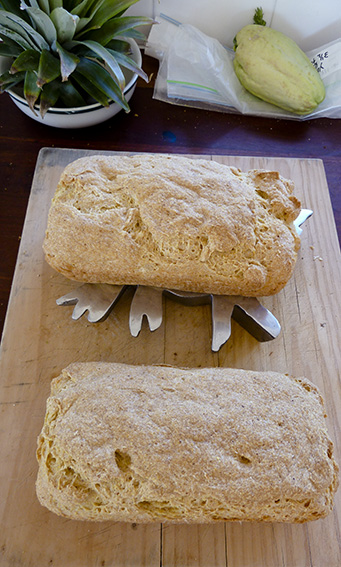
Gluten-free corn-bread recipe

P1050862_GF bread loaves_web

I know that there’s no obvious connection between gluten-free cooking and sustainability, but I think that the more we can take charge of our own health and diet, the more sustainable our lives, and society generally, will be.

We have had to develop our own collection of recipes, and frequently to invent recipes that suited our diets.

This gluten-free corn bread recipe is also egg-free and dairy-free, and if the yeast is replaced with baking powder it can be yeast-free too.

Some people at a workshop on simple living I attended last weekend asked me for this recipe, so I thought maybe I’d start an irregular feature of gluten-free food posts.  This first recipe can be found  here.  Good luck with it.

The two-day workshop was organised by the Citizens of the Lockyer with funding from the Lockyer Valley Regional Council, and run by Rhonda Hetzel from Down to Earth blog.  Rhonda is an inspiring speaker and generated a real buzz in the group, with lots of discussion and sharing of experiences and ideas.

Moringa oleifera – a definite candidate for our food forest

This morning I was reading an update from the Evolution in Motion Team about developments at the Permaculture Demonstration Farm at Phnom Katch Phkar in Battambang Province in western Cambodia and came across a mention of the Moringa tree – also known as the Drumstick Tree, Kelor Tree (Pokok Kelor in Indonesia), and a whole lot of other names.  I’d read about this tree before and been impressed by its many uses, but in thinking about species for our food forest it had completely slipped my mind.

Leaves of Moringa oleifera (source: http://www.burmanbioenergy.com)

Well, one thing led to another, as it does when you start reading something on the internet, and I came across a very useful report on the Moringa tree (scientific name Moringa oleifera) in Australia put out by Biosecurity Queensland in 2010.  The report is actually a weed risk assessment of the species (they find it presents a low risk), but contains the most useful summary of information about the species that I’ve found.  The report is available as a pdf file here.

I’ve taken the liberty of putting their description of the uses of Moringa (they call it the Horseradish Tree) below.  There’s a full citation at the bottom of the quote, but the following is from pages 14 and 15 of Navie and Csurhes (2010).

>>Moringa oleifera has been used for such a wide variety of purposes that it has been described  as a ‘miracle tree’. It is grown in many parts of the world as a ‘vegetable tree’, with the roots,  leaves, flowers and fruit all being used for food (Lu & Olson 2001). The leaves are probably  the most widely used part, being compared to spinach in appearance and nutritional  quality (Papillo 2007). Because  M. oleifera produces leaves during the dry season and  during drought, it is seen as a particularly useful green vegetable in developing countries  when little other food is available (Folkard & Sutherland 1996). Its leaves and pods have  considerable nutritional value, yielding many vitamins and minerals (Soto 2006), and the  leaves can be eaten either cooked or dried (Papillo 2007). The fruit, or ‘drumsticks’, are  cooked like green beans and have a similar flavour to asparagus (HDRA 2002). In India, they  are grown commercially for this purpose and are canned and exported to other parts of the  world (Papillo 2007). The green seeds, which are much like peas, and the surrounding white  material in the fruit can be removed from mature pods and either boiled or fried (Price 2000).

The roots have a pungent taste and are used as a substitute for horseradish, hence the common  name ‘horseradish tree’. However, the root bark has to be scraped off, as it contains two  alkaloids and the toxin moringinine (Price 2000). The flowers and immature fruit are used to  flavour curries (Qaiser 1973) and the gum in the bark is also used to season food (HDRA 2002).

Several parts of the plant are also used in native medicines and folk remedies for the  treatment of ear, eye and bronchial complaints, skin infections, fevers, stomach ulcers,  diarrhoea, syphilis and nervous disorders (Qaiser 1973; Price 2000; EcoPort 2007). For  example, the juice from the leaves is believed to stabilise blood pressure, the flowers are  used to cure inflammations, the pods are used for joint pain, the roots are used to treat  rheumatism, and the bark can be chewed as a digestive (Papillo 2007). This is just a small  selection of the wide range of ailments for which  M. oleifera has been promoted as an  effective medicine (HDRA 2002; Fahey 2005). It has also been widely described as having  antibiotic properties and being a cancer preventative (Fahey 2005). Few rigorous scientific  studies have been conducted to confirm these reports; however, a compound contained  in the flowers and roots, pterygospermin, has been found to have powerful antibiotic and  fungicidal properties (Price 2000).

It is also highly prized as a fodder tree in developing countries, where its leaves are fed to  cattle, sheep, camels, goats, pigs, poultry and donkeys (RBG Kew 1999; HDRA 2002). The  branches are often lopped for fodder, and animals are also known to browse the bark and young  shoots of this species (Qaiser 1973; HDRA 2002).  Moringa oleifera is used as a green manure in  developing countries, where it is said to significantly enrich agricultural land (Price 2000).

The wood is a good fuel for cooking and other purposes (HDRA 2002), and yields a blue dye  (Duke 1983). Woodchippings can also be used to make a good quality paper (HDRA 2002).  The bark can be used as an agent for tanning hides (Duke 1983; Soto 2006) and can also be  beaten into a coarse fibre that can be used to make rope or mats (HDRA 2002). The viscose  resin that is exuded from the bark is used in the textile industry (HDRA 2002).

The crushed leaves are also used as a domestic cleaning agent in developing countries,  being employed to clean cooking utensils and even walls (HDRA 2002).  Moringa oleifera also  provides nectar to honey bees for a long period of the year (ICRAF 2001; HDRA 2002).

Moringa oleifera has also been employed for erosion control in areas where strong winds and  long, dry spells occur simultaneously (ICRAF 2001). Because it grows very quickly it is often  planted as a living fence or windbreak in developing countries (HDRA 2002; Papillo 2007). In  Australia and other parts of the world it is also cultivated as an ornamental or for shade and  shelter (GRIN 2007).

However, the seeds are probably the most useful part of the plant. The oil that is extracted  from them, which is sometimes known as ‘ben oil’, is used for a wide variety of purposes  (Qaiser 1973; Stanley 1982). They also contain a powerful flocculant, which is used for  clarifying turbid water in developing countries (Lu & Olson 2001).

The seeds contain about 35–40% oil. This oil is of excellent quality, similar to olive oil, and is  slow to become rancid (Price 2000). It is used as a fuel for cooking purposes and burnt for light  in developing countries (HDRA 2002). It is also used in perfumes, as a lubricant in watches  and other fine machinery, and for making soap (Qaiser 1973; Stanley 1982; Price 2000).

The press-cake remaining after oil extraction has been shown to retain the active ingredients  for coagulation, making it a marketable commodity as a flocculant. It can be used as a quick  and simple method for cleaning dirty river water in developing countries (HDRA 2002). In  fact,  Moringa oleifera has been compared to alum in its effectiveness at removing suspended  solids from turbid water (Papillo 2007). It can also be used to harvest algae from waste  water, currently an expensive process using centrifuges (Price 2000). The press-cake also  contains high levels of protein and makes and excellent stockfeed or a good fertiliser for use  in agriculture (HDRA 2002; Brockman 2007).

In Australia, and other parts of the world, the greatest potential for this species is currently  thought to be in its cultivation for the production of biofuel. Yields of about 10 metric tonnes  of pods per hectare per year are thought to be achievable for this species (Duke 1983). It has  been suggested that this would equate to between 1000 and 2000 litres of biodiesel per  hectare per annum (Brockman 2007). Very high yields of oil have already been produced in  overseas situations, but it has not yet been widely trialled in Australia (O’Connell et al. 2007).  However, trials were recently initiated in south-western Western Australia and at Carnarvon,  and are also planned for the Pilbarra region (Low a& Booth 2007; SWCC 2007).

It is particularly desirable because it is a very low water-use crop and may be cultivated  on marginal land (i.e. in semi-arid areas, on poor soils and in saline areas) (Soto 2006;  Brockman 2007; SWCC 2007).  Moringa oleifera is being grown commercially on at least  one farm at Bowen in northern Queensland. The vegetable products of this crop are being  supplied to consumers in southern Australia, no doubt largely those from expatriate Asian  communities (Soto 2006). Production of these vegetable products in this region is about 35  tonnes per hectare per year (Soto 2006).

In other parts of the world,  Moringa oleifera is most commonly and quickly cultivated by  cuttings. Ideally, these should be taken from healthy branches containing hard wood in the  rainy season and be between 0.5 and 2 m in length (HDRA 2002). Frequent pruning of the  growth tips of cultivated plants will maintain and increase leaf growth and control the height  of the tree, making harvesting of the leaves and fruit easier (HDRA 2002).<< Source: Navie, S. and S. Csurhes (2010).  Weed Risk Assessment – Horseradish Tree, Moringa oleifera. Biosecurity Queensland, Brisbane. pp.14-15.  The references for the publications cited above are in the report here.

Cut seeds

Seeds of Moringa oleifera (photo: Aravind Sivaraj, Creative Commons Share Alike)

Some Useful Links

Wikipedia entry:  http://en.wikipedia.org/wiki/Moringa_oleifera

Gallery of photos (Indonesian):  http://ms.wikipedia.org/wiki/Pokok_Kelor

Gardening Australia Factsheet:  http://www.abc.net.au/gardening/stories/s1345822.htm

Growing and cooking tips:  http://www.daleysfruit.com.au/Herbs/horseradish.htm

Additional information:  http://www.newcrops.uq.edu.au/newslett/ncnl9192.htm

A really good slideshow:  http://www.treesforlife.org/sites/default/files/documents/Moringa%20Presentation%20%28General%29%20screen.pdf

Overview facts:  http://www.treesforlife.org/our-work/our-initiatives/moringa

DIY Composting toilet with worms

We decided from the outset that we were going to have a composting toilet.  There were a number of reasons for this, principal among which were that we didn’t want to waste an extremely valuable resource (humanure), and that we don’t have sufficient water to operate a flushing toilet.

The first model that we built, and which we used for more than ten years, was based on one of the 200L barrels used for shipping olives.  These barrels are usually available from places that recycle poly barrels.  The only reason that we stopped using this model was that it gets to be a bit of a chore to move a 200L barrel full of poop when the time comes to change it over.  It was taking me about half a day to undo the connections, replace the full barrel with an empty one, and re-connect it – and I always seemed to put off the change-over until it became urgent (i.e. a very full barrel) and that always seemed to coincide with another urgent priority.  Of course you could always install two 200L barrels side by side (both plumbed to drains and the air vent) and simply move the seat from one to the other, instead of changing over the barrels.  I’ll describe the new system which uses a 60L barrel in another post.

The basic principles of the design we adopted are: a) air is drawn down through “the mass” in order to keep up a supply of oxygen to the composting process and to remove smells through the bottom of the barrel and up to a high vent; b) a sufficient mass builds up to start and maintain an efficient composting process; and c) worms can be introduced to the mass while the toilet is in operation to promote the production of a rich compost loam.

A rich loamy compost with lots of happy worms

The final product – a rich loamy compost with lots of happy worms (the bits of straw don’t indicate that it is not fully composted – the straw was a top layer to help keep the mass from drying out)

In order to reduce the amount of text required, I’ll use photos to illustrate the construction of the unit.  Here’s a view of most of the components associated with the barrel.

Internal fittings and outside connections

Internal fittings and outside connections

In the background is the barrel with, on the left, a connection for extracting air from under the mass, and on the right, a drain for liquids.  The connections are made up from standard plumbing fittings.  In the left foreground is the base which supports the mass, made up of a circular section of 25mm galvanised mesh resting on some sections of plastic pipe – in the centre is some 225mm stormwater pipe (got it cheap as an offcut at the local irrigation supplies place), and some offcuts of 90mm stormwater downpipe (these dimensions aren’t critical, your pipes can be larger or smaller).  These are bolted together with galvanised 6mm bolts that have lasted for ten years, though they are now unrecognizable under a layer of rust.  You can also use reinforcing mesh supports  instead of the pipe sections as in this post on the Milkwood Permaculture site (though this gives a smaller space under the mass). This unit goes into the bottom of the barrel (after the drainage fittings are connected).

In the right foreground is the unit for drawing air down through the mass.  The vertical components are 50mm pipes with many holes drilled in them to facilitate air exchange with the mass (you could use polypipe for this – it’s more flexible and cheaper).  These are bolted onto a short length of 225mm stormwater pipe.  Note that the vertical pipes extend down past the 225mm pipe – the distance they extend downward is the same as the height of the stormwater downpipe lengths under the galvanised mesh on the left. These “legs” go through holes cut in the mesh (visible in the photo), so that the 225mm pipe section sits on top of the mesh.

The photo below shows the two units sitting in the barrel.  Short lengths of polypipe have been inserted into the tops of the vertical pipes to extend the aeration height.  The top ends of these extensions will be pulled to the sides of the barrel just under the top lip and fastened with wire loops through holes in the barrel.  If they aren’t pulled to the sides they tend to snag toilet paper as it is dropped into the barrel.

All components in barrel

All components in barrel

When the barrel is in place and ready to be used a layer of newspaper is placed over the mesh and then a thick layer of straw (we use barley straw) is put on top of that.

The photo below shows the detail of the air outlet.

Air outlet detail

Air outlet detail

There are four parts to this connection.  A male/male connection is screwed into a hole cut in the side of the barrel with an appropriately sized hole saw (keep it close to the bottom, but not so low that it will be lower than the liquid drain) so that the thread protrudes inside the barrel.  A connector (i.e. with internal thread) is screwed onto this inside the barrel so as to clamp the fitting onto the wall of the barrel.  Before tightening this I’ve put some bathroom silicone into the space around the connector on the inside and outside of the barrel to make a good seal.  Reaching to the bottom of the barrel will almost certainly require getting your head and at least one shoulder into the barrel – not easy to do.  I once rolled some distance down the hill with my head and part of my upper body inside the barrel!  The fitting on the outside end of this connection has various names.  My local plumbing supply calls them “dress flanges”.  Anything will do that will fit into the flexible pipe shown in the photo below.

I won’t show the details of the liquid drain.  It’s the same principle as the air outlet, but with appropriately sized fittings, and as close to the bottom of the barrel as you can place it.  Just make sure that the connection between the pipe coming out of the barrel and the drain to take the liquid away is easy to connect and disconnect. After a lot of frustration I settled on camlock fittings (you’ll have to ask your local hardware or plumbing supply place what these are as I don’t currently have a photo of one – there are some details on these fittings here).

Air outlet with flex pipe

Air outlet with flex pipe

The flex pipe can be difficult to source in our area.  Most places sell this pipe with many slots in it for use as a greywater distribution pipe but we need it without any holes.  In the end I got mine from an agricultural machinery parts supply place that sells it as a spare part for seeding machinery.

This pipe is connected to a vertical vent pipe (another length of 90mm stormwater downpipe).

Bottom of vent pipe

Bottom of vent pipe

The fittings here should be pretty obvious.  The reason for the Y-junction at the bottom of the vent pipe is to allow condensation or rainwater to be drained out (in practice it seems to collect here and then evaporate without needing any intervention).

At the top of the vent pipe you’ll need a sewer vent whirlybird. They’re available from plumbing supply places.  You can get one to fit onto 90mm or 100mm stormwater pipe, but I added a short length of wider pipe at the top and got a whirlybird that would fit onto that.  The top of the vent pipe (or all of it) can be painted black so that the sun heats the air in the pipe and starts it moving upward, assisting the whirlybird to draw air down through the mass in the toilet.  The wider pipe at the top just provides a larger volume of air to be heated – I’m not sure whether it makes any difference or not.

Whirlybird on top of a section of wider pipe

Whirlybird on top of a section of wider pipe

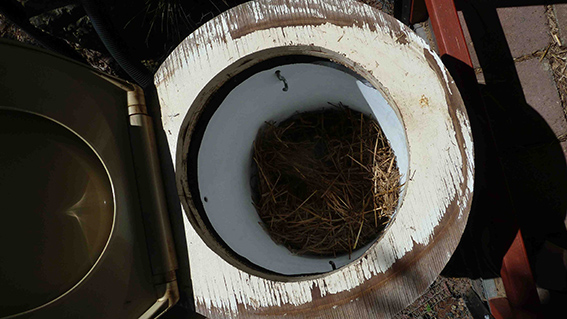
That’s about it, apart from putting a seat on top of the barrel.  I used the screw-down flange that holds the top of the barrel in place (photo below) and just trimmed a bit of the edge of it at the front to allow well endowed males to use the toilet without incurring any risk.  Ignore the white insert in the barrel, this is part of a trial of  new approach that doesn’t allow for composting in the barrel but removes the need to wrestle with a full 200L barrel when full.  I’ll describe it in another post.

Top on barrel

Top on barrel

The seat base in the photo below is made from two layers of marine ply.  The top layer is large enough to sit over the top of the barrel and to carry a standard toilet seat.  The lower layer (not visible here) has the same size hole as the upper layer and is glued and screwed to this.  It is just large enough to fit into the screw-on top of the barrel without too much free play.  In this way the seat stays in place without moving around when you sit on it, but can be easily lifted off the top of the barrel.  This doesn’t have to be marine ply, but since it was going to be out in the weather for years I thought it was worth the extra cost.  You can see the toilet seat to the left of the photo and in the lower photo – it came from a recycled timber yard.

Seat base

Seat base

Seat_webHere’s a shot of the two barrels in place.  The “resting” barrel on the left finishes composting while the barrel on the right fills (you can’t really see it because it’s covered with shade cloth – the photo was taken in summer and the shade cloth is needed then to keep the barrel from getting too hot for the worms).

Two barrels in place

Two barrels in place

Once the barrel is about one-third full we add some compost worms from one of our worm farms to it and cover them with a layer of damp soil.  At first we doubted that they would tolerate this environment, but they take to it readily and by the time the barrel is full it has a good population of worms and a lot of the mass has already been broken down by them.

With just the two of us using it the barrel takes six to nine months to fill.  In fact in the later stages the mass is reducing in volume, as a result of the composting process and the actions of the worms, just about as fast as we are adding volume to it.

There aren’t any special precautions to take with this type of toilet, apart from making sure the mass is damp enough to keep the composting going – we keep a spray bottle near the toilet, but seldom need to use it.  People who are taking antibiotics should refrain from using the toilet in case the antibiotic residues affect the composting process, and no non-compostable material (e.g. cigarette butts, tampons) should be put into the barrel.

When the full barrel is first moved to the resting position we put a layer of kitchen scraps on top and cover it with damp newspapers.  This encourages the compost worms that are already in the barrel to come to the top and start work on the top layer. If the worm population isn’t obvious in the top layer within a couple of weeks we add more compost worms.

The resting barrel has a liquid drain and a flexible hose connected to it, but the latter is mostly to keep critters from getting into the bottom section of the barrel.  I always intended to connect this to the vent pipe but never got around to it, and in the end it didn’t seem to matter.  In fact increasing the air flow might have dried out the mass too much.  Keeping the top of the mass damp is one of the few management measures that the resting bin requires.  We generally cover it with a thick layer of wet newspapers or hessian, and try to remember to add water to this occasionally.

You can wait for all of the mass to be composted and then empty the barrel just before changing it over with a new full barrel, but we have found that the worms population will be larger and work more effectively if we regularly take off the top layer of composted worm castings.

I’m happy to answer any questions about this system or to give advice on construction.